Silverstack comes with HD-SDI output to play out ingested clips in best quality for QC on an HD-SDI monitor. The current clip in the player gets mirrored to the HD-SDI output showing the image in full-screen and 10 bit color depth.
Supported Devices
To enable the HD-SDI output you need one of the following devices:
- AJA T-TAP
- AJA KONA series
- AJA Io series
- Blackmagic Design Ultrastudio Products
- Blackmagic Design Mini Monitor
- Blackmagic Design Decklink Cards
Attach the according interface to your Mac (Thunderbolt or PCIe) and connect the HD-SDI output of the device to the selected destination.

Figure 1: Example of a Silverstack HD-SDI setup with Blackmagic Design’s Ultrastudio Express
Drivers
In order to use the supported devices you have to install all drivers and necessary software provided by the the manufacturer.
For Blackmagic Design devices that is the “Desktop Video” software you can download in their support area.
For AJA Devices that are the “AJA hardware drivers” included in the latest “AJA software installers” also available in their support area.
External Video Preferences
As soon as the HD-SDI device is connected, Silverstack requests permission to use it for playback. In case you decide to activate the SDI playback later, you can enable it through “Preferences>External Video”. You can disable the use of the device from the same menu in case another application demands its use (i.e. parallel use of the hardware with other software). If you have multiple output devices attached, you can select which one to use by choosing it in the drop down menu:

Figure 2: External Video settings
Additionally you can choose to release the device when Silverstack is in background. By default it will be kept even if Silverstack is in background.
The HD-SDI Indicator
As soon as you enable the external video output in the preferences a little indicator in the toolbar of the Silverstack media player will give you hints on the status of the HD-SDI output:

Figure3: The HD-SDI indicator will show up in the toolbar of the media player and the Miniplayer.
There are 3 statuses possible:
1. HD-SDI output enabled and working:

Figure 4: HD-SDI Indicator showing a working HD-SDI output.
Click on the indicator to reach the External video out settings with the settings for the HD-SDI output.
2. HD-SDI output enabled but no device attached:

Figure 5: HD-SDI indicator showing that no device is attached
Click on the indicator to reach the External video preferences to set up your attached device.
3. HD-SDI output has problems

Figure 6: HD-SDI indicator notifying about problems with the attached device
Click on the indicator to see details about the problem.
Info:
A usual case causing this status of the indicator would be another application that tries to use the same HD-SDI device as Silverstack. Deactivate the background use in the preferences of the application trying to use the same devices as Silverstack to avoid the problem.
Playback Modes
You can choose between two playback modes:
- Absolute Time Playback: Tries to play back footage in sync with audio. Silverstack will skip frames to stay in sync with audio when video processing or I/O is too slow.
- Every Frame Playback: Aims to play back frame exact which leads to loosing audio. Silverstack will play back frame exact even if that leads to non-realtime playback.
To select the desired mode go to “Playback” in the main menu of LiveGrade and select the according entry right at the top:
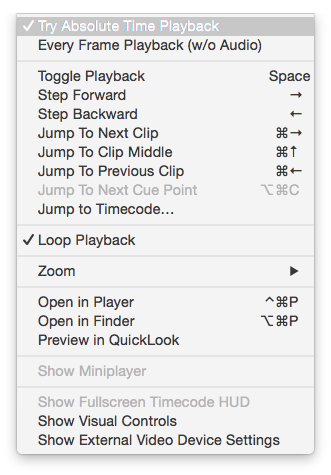
figure 7: Select playback mode from the main menu
Image processing
There are different options when it comes to display the clips through the SDI device. You can modify these settings on the External Video Out window.
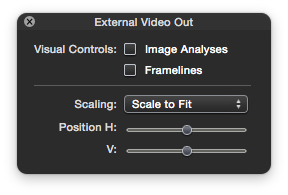
figure 8: External Video Out settings window
These are the available settings:
- Visual Controls: enable/disable the «Image Analyses» like False Color and Exposure Range, as well as Framelines. Learn more about frame lines from the article Frame Lines in the Playback View.
- Scaling and Position:
- Scale to fit: fills the output display with the image to compensate for a difference in the resolution.
- 1:1 Pixels: displays the image in full resolution, which can crop the image id the output display has less resolution than the source.
Supported Frame Rates and Resolutions
Supported frame rates and resolutions are:
- 720p50
- 720p59.98
- 1080p23.98
- 1080p24
- 1080p25
- 1080p29.97
- 1080p30s
Silverstack has a fallback resolution (1920 x 1080 HD) and frame rate (25p) that is executed when the desired resolution and frame rate is not supported by your hardware device. Silverstack will also try to find a solution that matches the closest to your desired format by using the following procedure:
- find for a perfect match (same resolution, same framerate)
- if none found, find a mode with same resolution and fallback-framerate.
- if none found, find a mode with fallback resolution and original framerate.
- if none found, use fallback resolution and fallback framerate.
Interlaced formats are currently not supported.
HD-SDI Features and Quality Characteristics
| Color Reproduction | HD video matrix and gamma (ITU-R BT.709; ITU-R BT.1886) |
| Timing | Sync to next available video frame rates (see Supported Frame Rates and Resolutions and Playback Modes) |
| Code Values | 10-bit legal range YCbCr output (internal 16-bit RGB processing) |
| Embedded Audio | Not supported |
| Metadata Output | Not supported |
The Miniplayer
Additionally, you can enable the Miniplayer from the same menu, which enables to monitor the same image send through the SDI output on the computer display, at the same time as you navigate across the Project Library.
When the HD-SDI Output is enabled it will automatically open the Miniplayer to keep the HD-SDI output though you switched to the list or table view etc. As soon as you close the Miniplayer the HD-SDI output will be disabled.
You can reopen the Miniplayer manually from the Main Menu. Go to “Playback > Show Miniplayer” to open it up again. You can also open it from the Miniplayer symbol in the header bar on the right.

figure 9: the Miniplayer