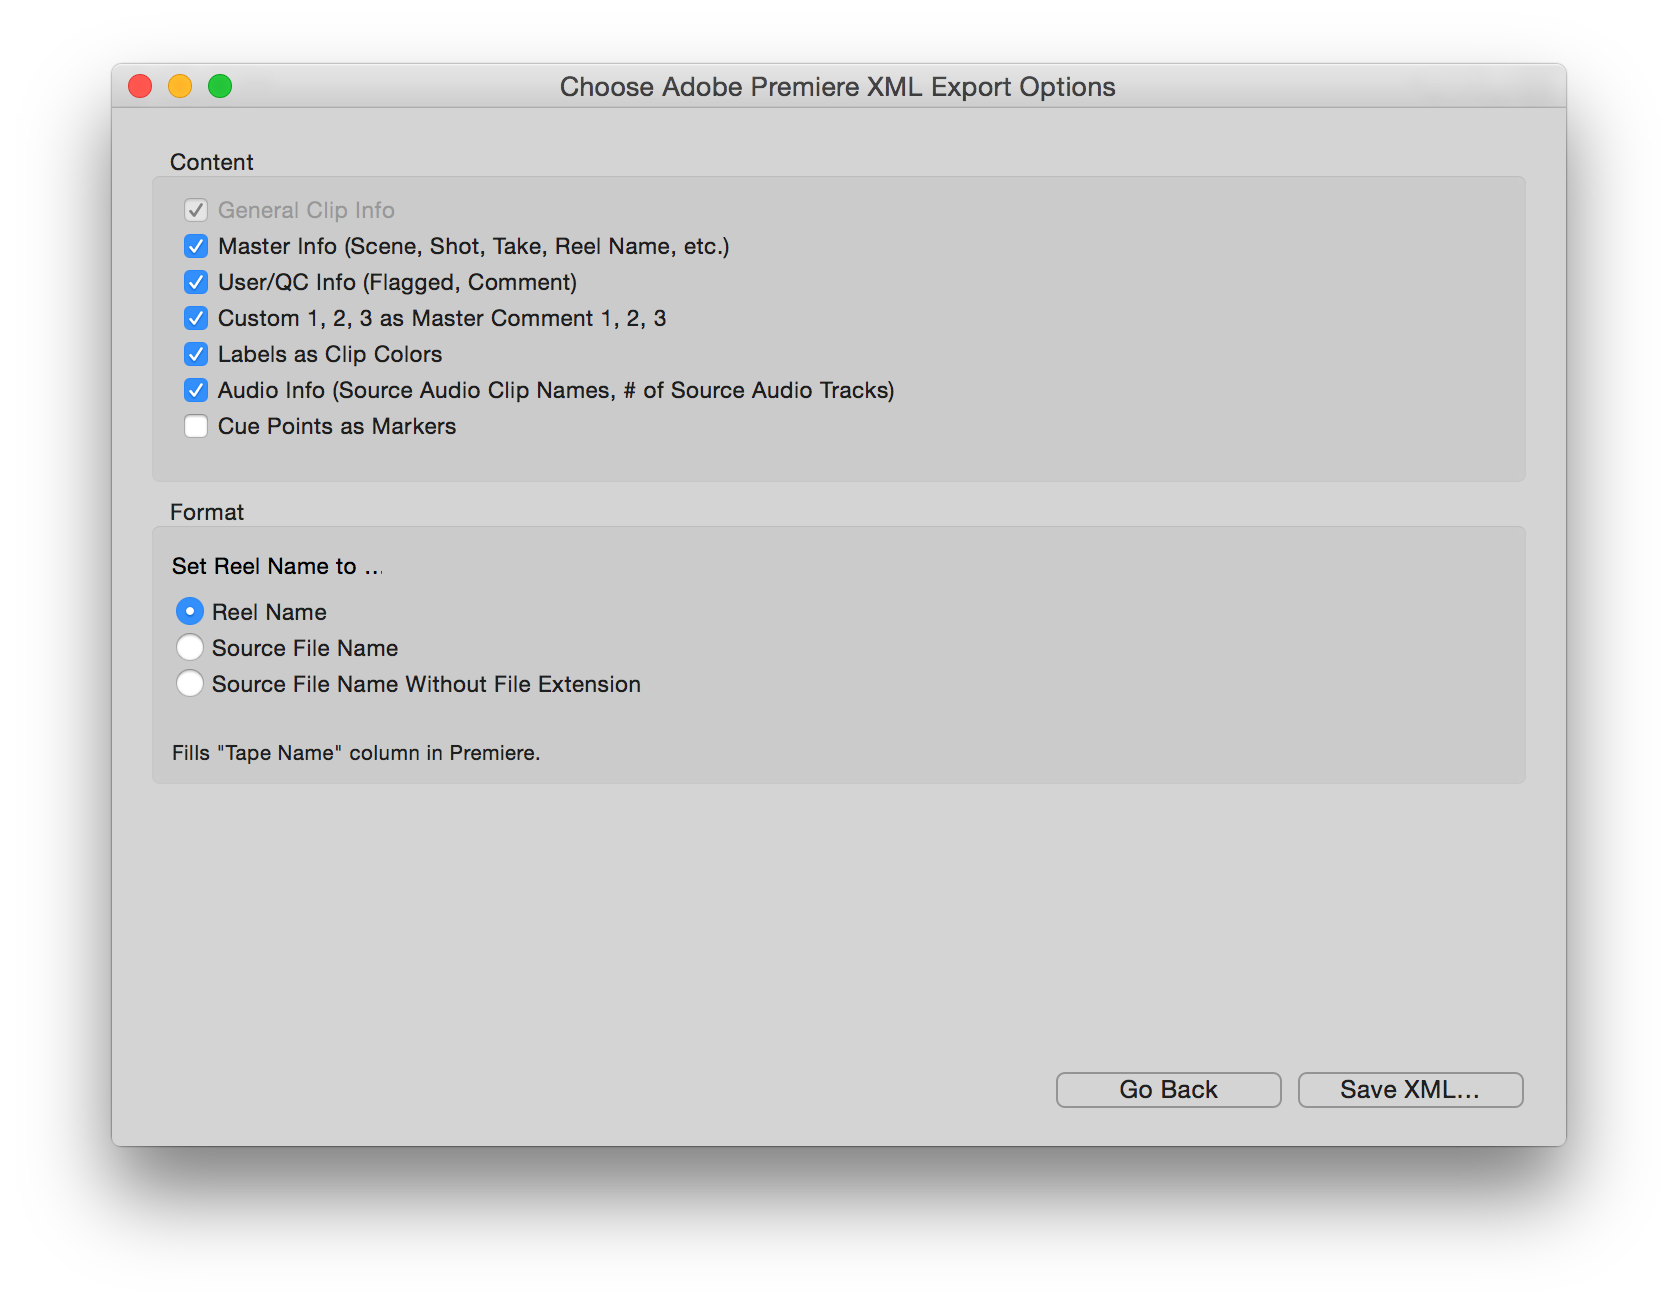
Pomfort SealVerify can detect different error cases. The application will tell you the reason of the error. In any case the Seal Info will give you the needed information to contact the original sealer of the drive to talk to him about a possible reason and solution to the problem. Here are the different error cases the application will be able to give you.
File Does Not Exist
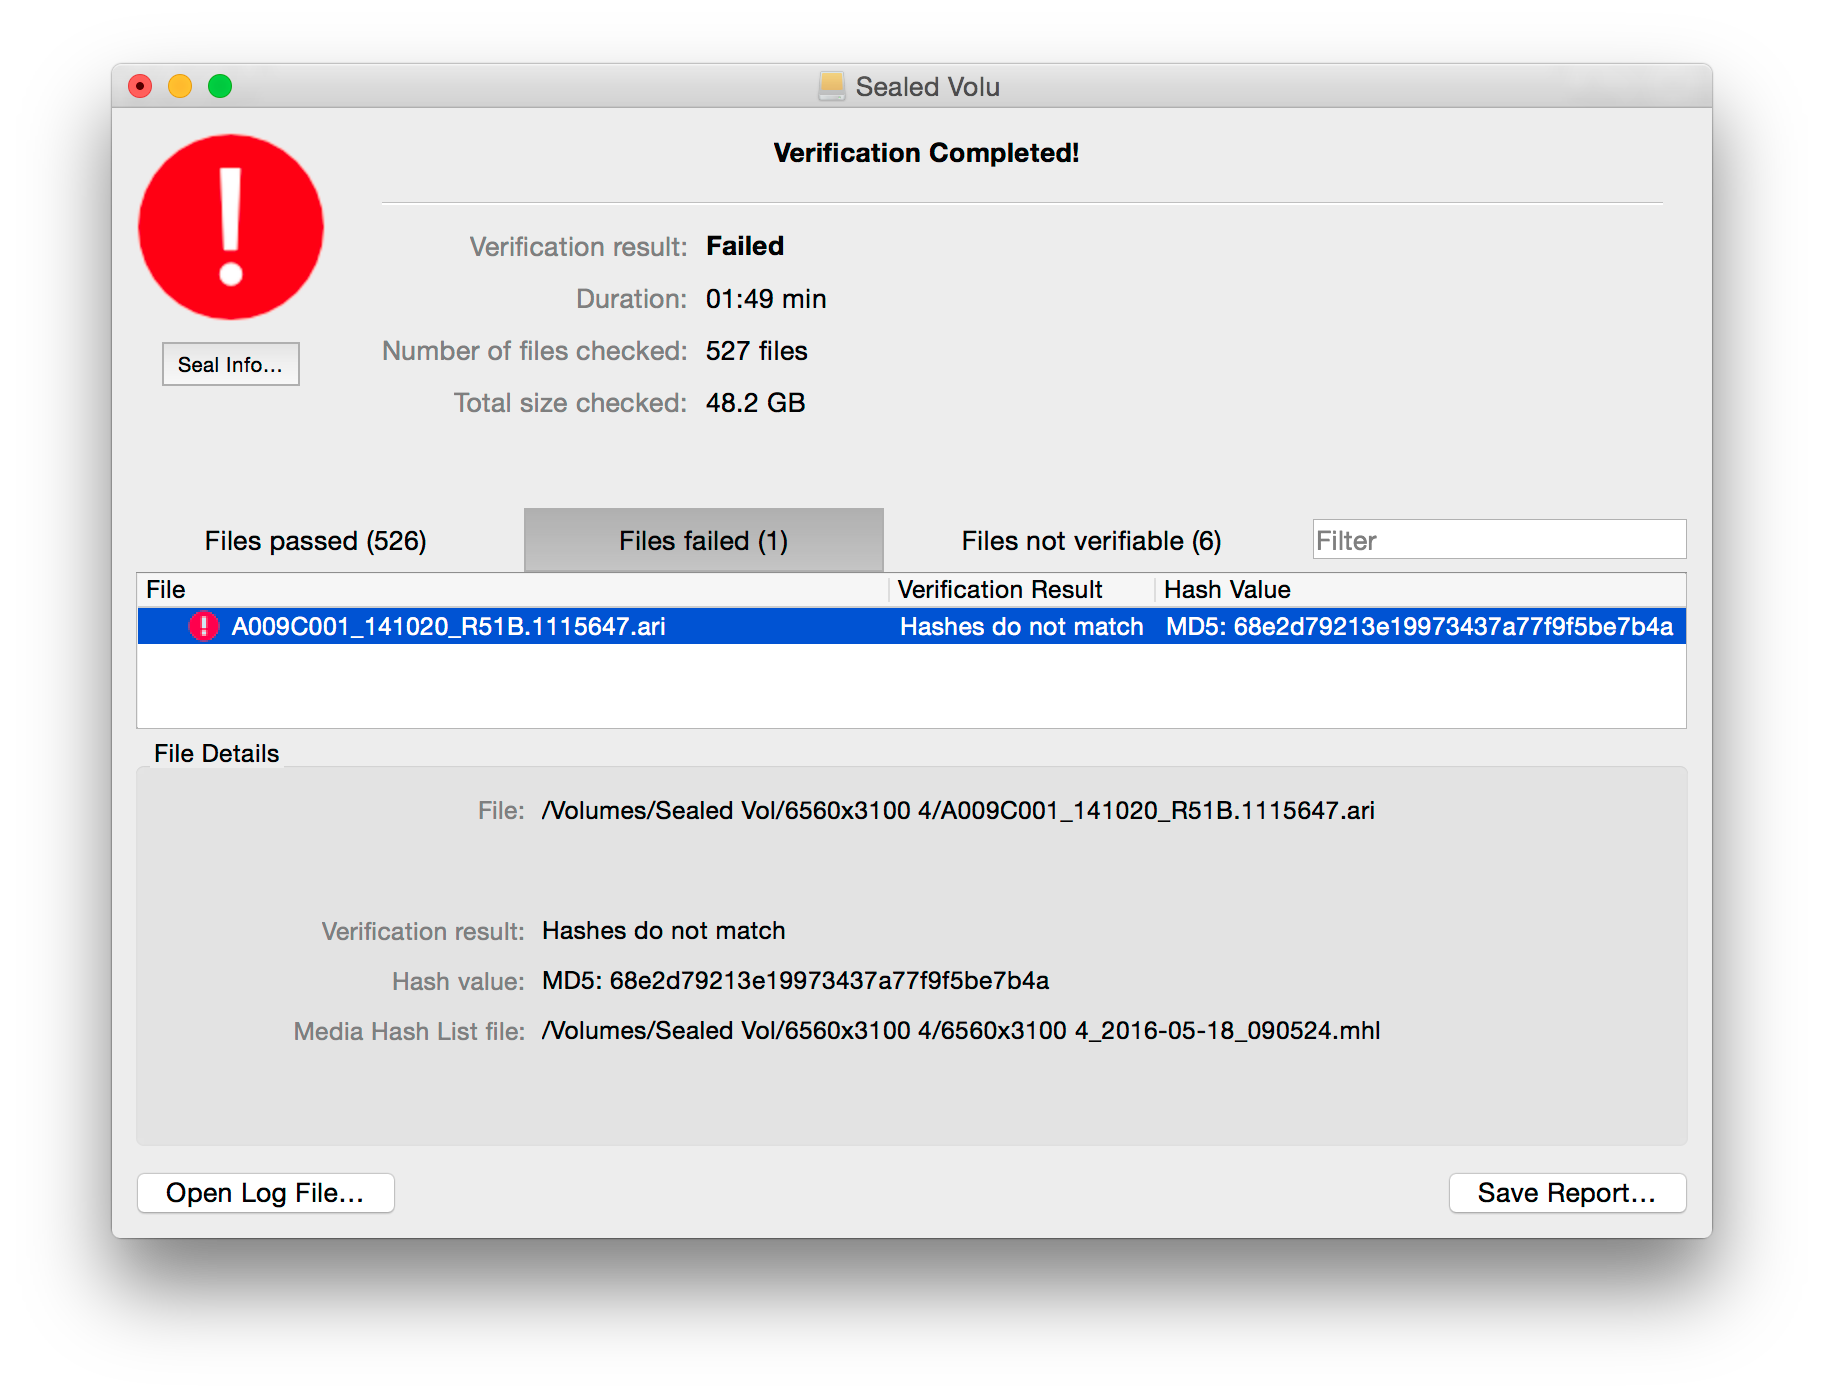
As soon as a file fails you will already see it in the ongoing process:
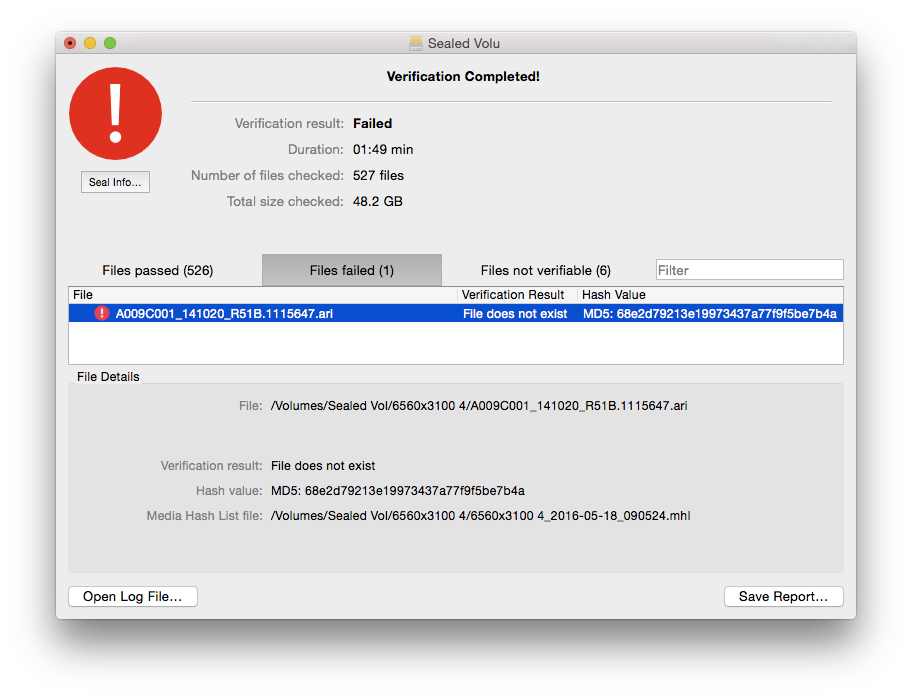
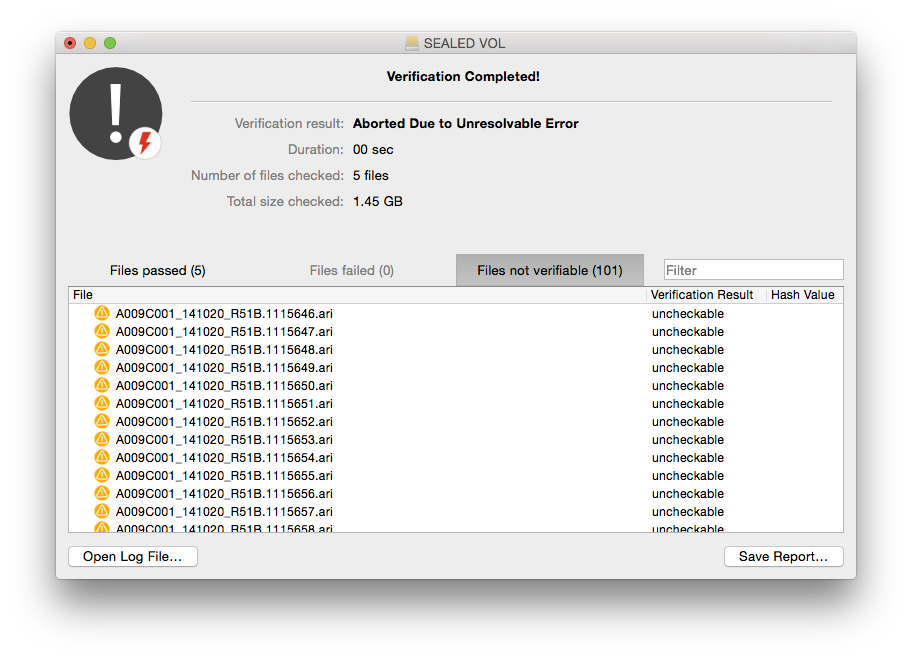
When the verification is completed you will see the clear protest sign that clearly expresses the failed verification. You can find the reason for the failure in the verification result column or select the failed file in the table for more details about it:
This error case is a special case of hashes do not match. It will tell you additionally that the file size of the existing file does not match the original:
Image may be NSFW. Clik here to view.
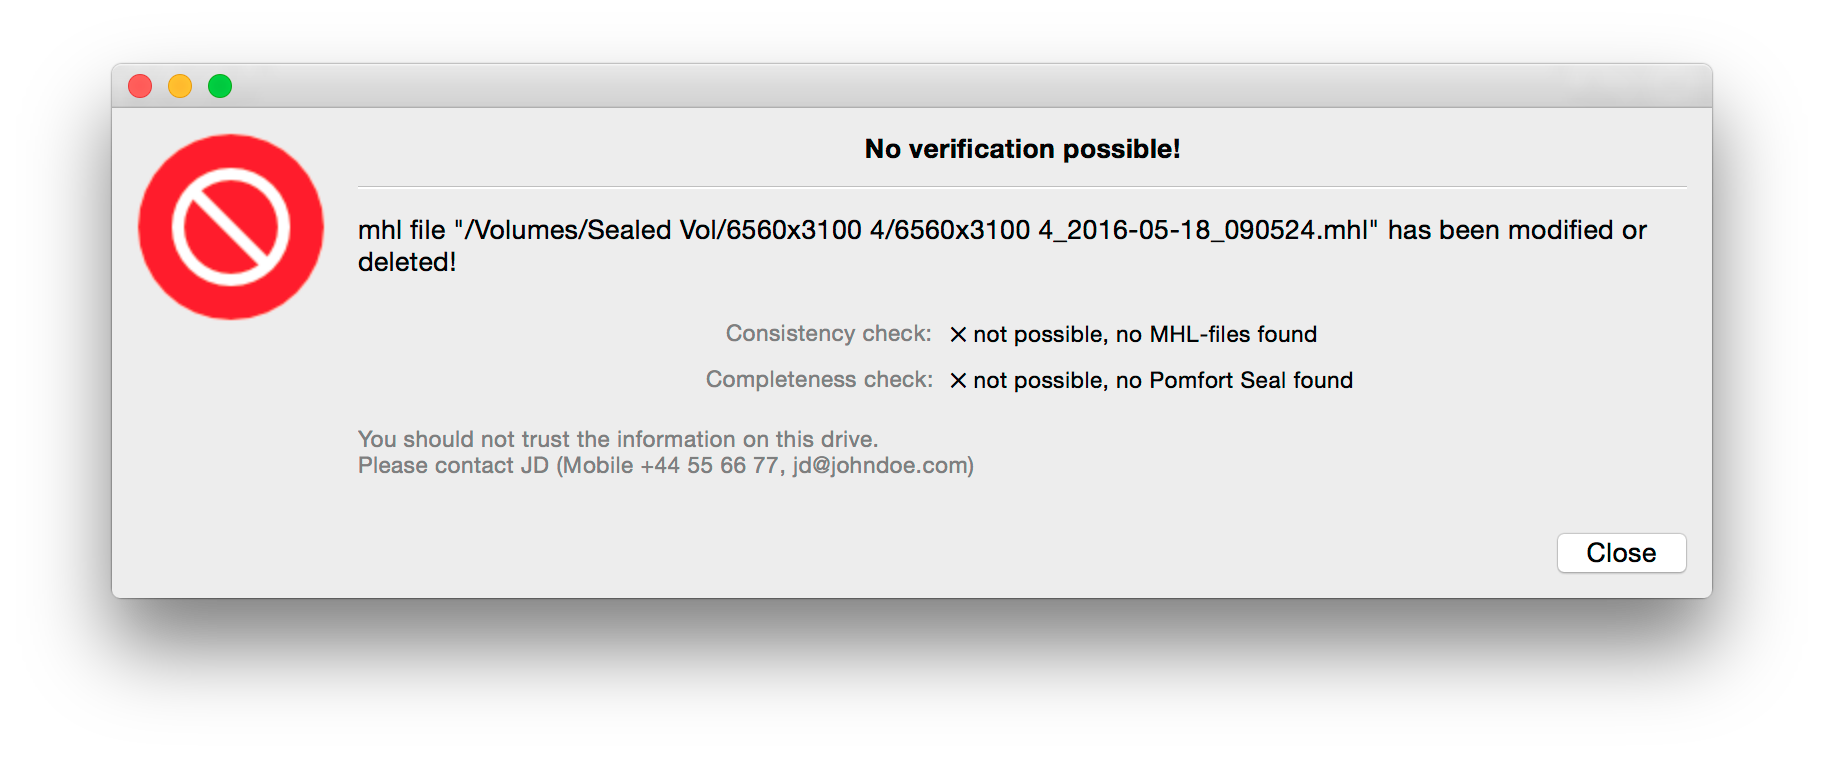
No MHL File Found / MHL File Was Altered
If the drive is sealed and an MHL file was altered or does not exist anymore, Pomfort SealVerify recognizes that the seal was broken. You will see the following error message:
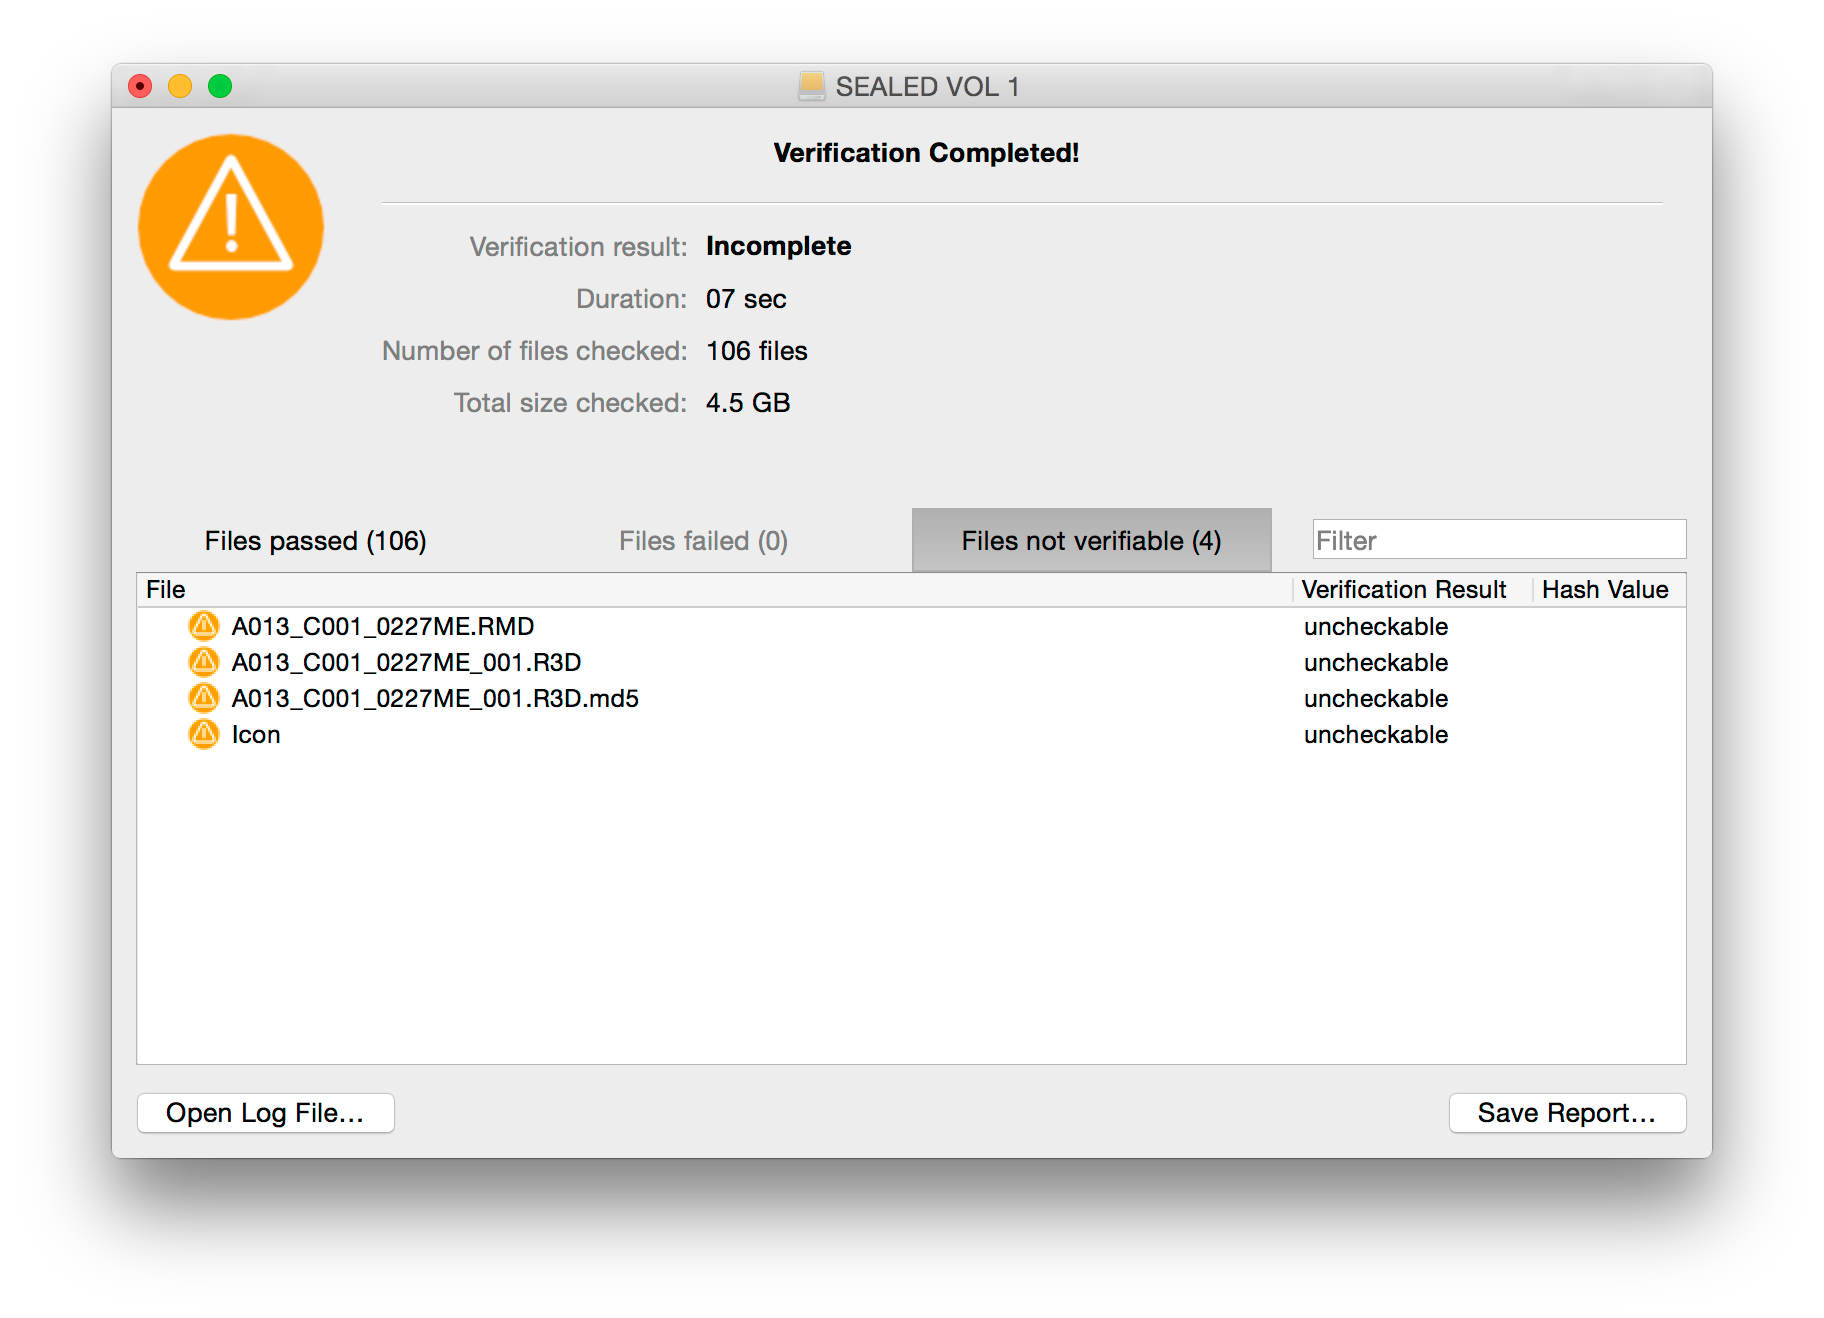
In case you are only verifying MHL files without a seal or files have been copied by hand onto the drive after sealing it with Silverstack you may run into files that cannot be checked because they are not referenced in any MHL file. You will get the following finished verification status:
There is a fast solution to create references to video clips in the Project Library in Silverstack. Instead of copying clips to another storage device, you can select to just ingest them. This process allows a faster way to have the clips in the Project Library for subsequent tasks such as backup, LTFS backup, quality check or metadata editing.
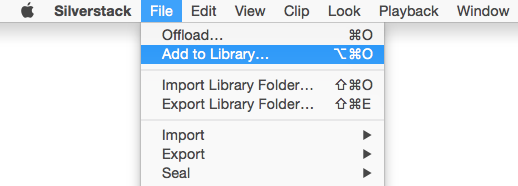
In order to add the clips, simply select “File > Add to Library…” or use the keyboard shortcut ⌥⌘O:
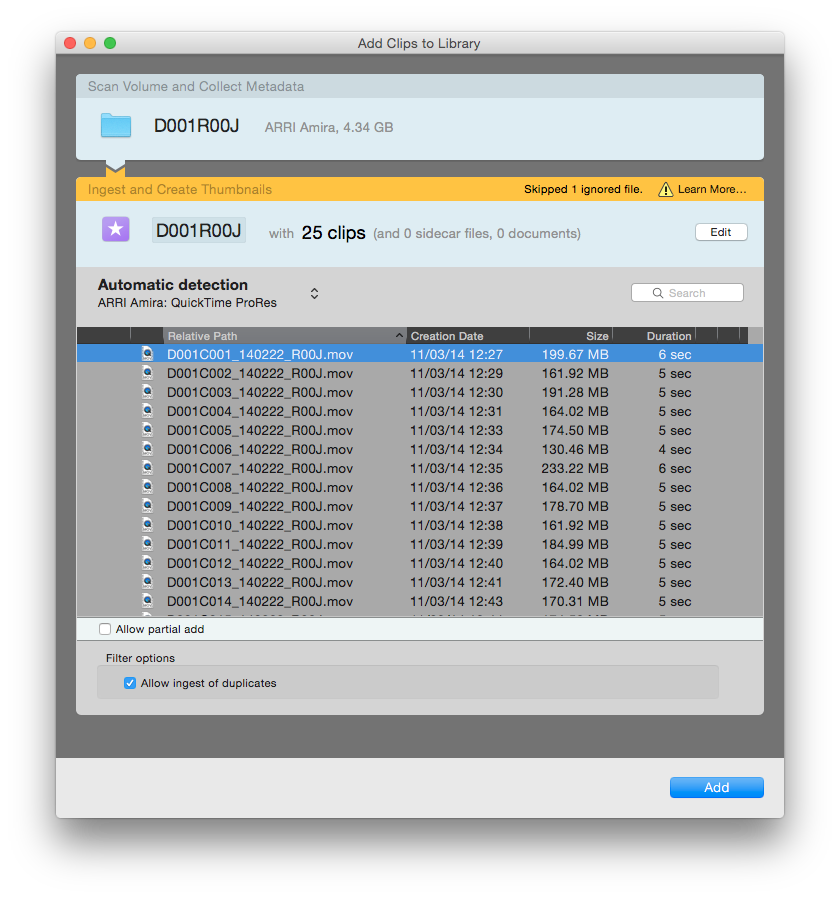
The ingest wizard allows you to check which clips are being ingested before proceeding. Once you click on «Add», Silverstack starts creating the references for the clips in the Project Library by reading the metadata and creating the thumbnails. After the thumbnail creation is finished, the clips will be available in the library to start working with them:
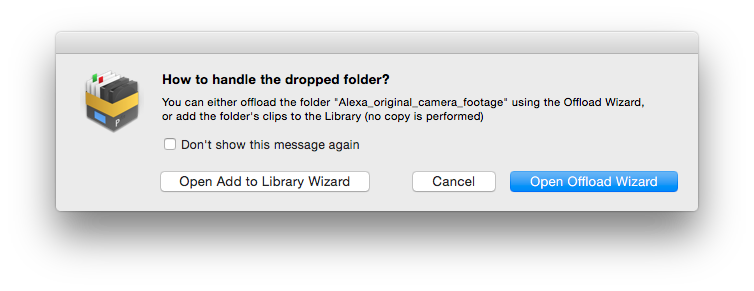
Alternatively, you can also ingest clips by drag and dropping the containing folder into the Silverstack dock icon or the Silverstack Library Folder. When using this functionality for the first time an alert will ask you what you want to do:
If your intention is to only register the clips, please select the option «Open Add to Library Wizard». The process is the same as previously described. Otherwise, select «Open Offload Wizard» if you decide to copy the media to backup drives in addition to registering the clips in the Project Library.
In case you enable the checkbox «Don’t show this message again», Silverstack will always use the selected option in the future.
Pomfort announces an upgrade to its look and color management software LiveGrade and LiveGrade Pro that will be officially available in July 2016 – All members of the Pomfort beta program as well as selected customers now have the chance to preview and test the latest beta of LiveGrade Pro 3.6.
What’s New in LiveGrade 3.6 ?
LiveGrade 3.6 comes with various Features and Improvements.
Features:
Support for FSI BoxIO — Added full support for dual and single channel mode of the FSI BoxIO LUT-Box.
Image View output to HD-SDI — Mirror the Image View in LiveGrade Pro to HD-SDI with compatible third party devices.*
Linked Looks — Link multiple slots and sync their nodes to control looks collectively.
Support for 1D LUT files — New 1D LUT node that allows loading of 1D LUT files.**
Download of ACES versions — Download and manage ACES versions in the preferences.
Update to ACES v1.0.2 — Added the latest ACES version 1.0.2.
Improvements:
Improved capturing of pre-graded signals — Enhanced handling of pre-graded HD-SDI signals as Image Sources.
More flexible loading/saving of ASC-CDLs — Load and save ASC-CDL files (*.cdl) directly to/from CDL nodes.
Improved still image export — Meaningful default naming for still exports and shortcut for fluent saving of consecutive stills.
Improved Convergent Design LUT — Minor improvements for Convergent Design .cdlut export.
*Requires a compatible device such as Blackmagic Design Ultrastudio Express or 4k, DeckLink Card or Mini Monitor and AJA T-Tap, KONA or IO-series.
**Supported formats are *.data, *.lut and *.txt.
ATTENTION:
The LiveGrade Library will be updated when running this beta version. Please make sure to keep a backup of your old library to go back to the version you are currently running.
You can find the library folder by going to the Main Menu in LiveGrade and selecting “LiveGrade > Show Library in Finder”.
LiveGrade Pro allows to link slots and sync image processing nodes between slots. Thus it is possible to build two independent processing chains that can contain unique as well as shared processing steps.
Content
Sections:
Basic Principles
Linking Slots
Syncing Nodes
Saving Linked Looks to the Library
Creating Individual Looks from a Linked Look
Exporting Linked Looks
This article will…
…help you understand the basic principles of Linked Looks in LiveGrade Pro.
…teach you how to link slots and sync nodes.
…give you insights how to handle Linked Looks in the library and for export.
Basic Principles
If you are not familiar with the device manager and the basic use of slots in LiveGrade please visit the article Slots View and Device Manager.
The basic idea of the Linked Looks feature is to control two slots at the same time. Also important is being able to adjust parts of a look separately and other parts simultaneously. While two or more devices are involved you can adjust certain parameters of the look simultaneously for all devices while other parameters can be set uniquely for each device.
Basically that will be achieved with two simple steps:
Linking slots
Syncing and unsyncing nodes between the linked slots
By linking slots you decide which two or more slots will synchronize nodes between each other. Then you can decide which nodes to sync and which not to sync.
Linking Slots
In order to link two slots, open the Device Manager via the “Devices” button on the left side of the LiveGrade main window:
Inside of the Device Manager look for the “Link Slot” dropdown in one of the slots. From the dropdown choose “Link with slot” which will also contain the according letter of the other slot you link with:
After successfully linking the slots a chain symbol will appear next to the dropdown. Additionally the slot characters of the slots that are linked appear next to the chain icon:
Fig. 3: Two linked slots A and B for BoxIO in dual channel mode.
The slots view on the left side of the main UI of LiveGrade will also show the chain icon accompanied by the slot characters of all the slots that are linked.
Here is an additional example showing that more then two slots can be linked as well. With a FSI BoxIO in dual channel mode plus a Teradek COLR, the Device Manager screenshot shows three slots that are linked and therefore can sync nodes:
Fig. 5: Nodes showing the chain indicator for connected processing
It indicates the synchronization state of the node:
Blue chain button: Node is synced between linked slot (indicated with a red frame)
Grey chain button: Node is unsynced between linked slots and therefore controlled independently (indicated with a grey frame)
You can switch the linked state of a node by clicking on the chain buttons.
You can now switch between the two slots to build your look with synced and unsynced nodes. If you have a node unsynced and change its setting, it will only change in the edited slot. If you then click the chain icon to sync it with the linked slot the settings of the node will simultaneously be applied to the according node in the linked slot.
Important
When you connect slots they will always keep the same grading mode and exact same node structure in the grading panel. If you delete a node from one slot it will also be deleted from the linked slot and vice versa. The same behavior takes effect when adding nodes.
Saving Linked Looks to the Library
By clicking the “New Look” button in the toolbar of LiveGrade you can save looks to the Look Library:
When you have two or more slots linked the stored look will contain the node structure for both slots in the exact configuration at the point of time you stored them.
If you apply a look from the library that was saved in linked slot configuration it will restore the same node structure and the same sync status and setting of the nodes and slots you configured before.
The Linked Slots Column
You will be able to identify linked looks by taking a look at the “Linked Slots” column. It contains the information about the linked slots. It is easily detectable of how many independent looks the linked looks persists of and from which slots they were saved.
Depending on the setting for “Look Creation” in the preferences that chooses the automatic camera value, the Linked Slots column is either filled with the slot character or the slot name:
You can split linked looks up into their separate, standalone looks. The Linked Look consists of several standalone looks that come from the different slots. For each slot a standalone look is stored as part of the linked look. The number of standalone looks that will be created is easily predictable by the number of slots the Linked Look possesses (see also Linked Slots column). The Linked Look stays in the library unaltered.
To create individual looks from a Linked Look select the Linked Look in the library and then perform a right click on the linked look:
Image may be NSFW. Clik here to view.
Fig. 11: Context Menu of a Linked Look
From the context menu choose “Creating Individual Looks from a Linked Look”. You will then receive two or more standalone looks depending on the number of linked slots.
The name of the standalone looks will be extended with “Slot” and the character or name of the slot it is coming from (depending on the settings in the preferences):
Fig. 12: A Linked Look with the standalone looks it consists of.
The example in fig. 12 shows a Linked Look (“Linked Look 2”) and the result of creating individual looks from it. The resulting standalone looks receive individual thumbnails and the slot name from the Linked Nodes column. Therefore the Linked Slots column is empty, which is always the case for standalone looks.
Exporting Linked Looks
3D LUT, ASC-CDL, Pomfort Look
There are several possibilities to export a look:
3D LUTs: Linked Looks will be exported to all LUT formats by splitting up the Linked Look into its different standalone looks.
ASC-CDLs (.cdl): For each standalone look one .cdl file will be exported.
Pomfort Look (.pfl): As for the 3D LUTs the look will be split into its standalone looks.
Similar to creating individual looks from Linked Looks the export functionality with linked looks will always add “Slot” and the character or slot name (depending on preferences) to the end of the file name.
Pomfort Look Archive
A Pomfort Look Archive can be exported including Linked Looks. A compatible version of LiveGrade will be able to import the Look Archive again including the intact Linked Looks. Importing the Look Archive into Silverstack will result in standalone looks in the Silverstack Look Library.
LiveGrade Pro comes with HD-SDI output to mirror the Image Viewer to HD-SDI via supported third party devices. The current Image Source in the Image Viewer is mirrored to the HD-SDI output showing the image in full-screen and 10 bit color depth.
Supported Devices
To enable the HD-SDI output you need one of the following devices:
AJA T-TAP
AJA KONA series
AJA Io series
Blackmagic Design Ultrastudio Products
Blackmagic Design Mini Monitor
Blackmagic Design Decklink Cards
Attach the according interface to your Mac (Thunderbolt or PCIe) and connect the HD-SDI output of the device to the selected destination.
Figure 1: Schematic presentation of a LiveGrade setup with HD-SDI output
Please be aware that the Ultrastudio Express can only be used either as an input or as an output to or from LiveGrade. It can not be used as in- and output at the same time. This is due to hardware limitations of the product. The output will show the loop through of the signal that is not equal to an output out of LiveGrade that mirrors the Image Viewer and can contain looks or a reference image.
Drivers
In order to use the supported devices you have to install all drivers and necessary software provided by the the manufacturer.
For Blackmagic Design devices that is the “Desktop Video” software you can download in their support area.
For AJA Devices that are the “AJA hardware drivers” included in the latest “AJA software installers” also available in their support area.
External Video Preferences
To enable the HD-SDI device in the preferences. Go to “Preferences>External Video”. Choose the intended device from the dropdown.
You can disable the use of the device from the same menu in case another application demands its use (i.e. parallel use of the hardware with other software). If you have multiple output devices attached, you can select which one to use by choosing it in the drop down menu:
Additionally you can choose to release the device when LiveGrade Pro is in background. By default it will be kept even if LiveGrade Pro is in background.
Mirroring the Image Viewer Including References
The HD-SDI output will display the Image in the Image Viewer. The Image Viewer has to be opened in order to send an image to the HD-SDI output.
You can set a reference for the current Image Source to attain a split screen to compare two looks or stills. The reference will also be visible on your external HD-SDI reference monitor.
For general information about setting up LiveGrade with HD-SDI devices please refer to the article HD-SDI Setup for LiveGrade.
Adding the FSI BoxIO as a Device
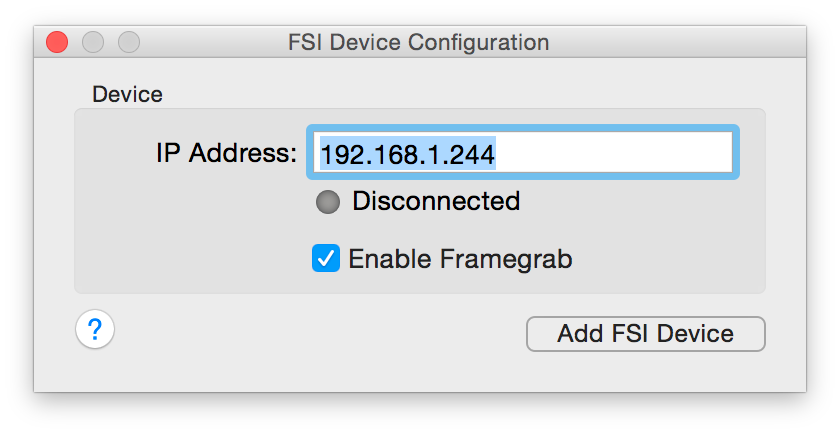
In order to exchange look information with LiveGrade Pro, the FSI BoxIO needs to have a working network connection with the Mac where LiveGrade Pro is running on.
The default IP address for BoxIO can be found on the bottom of the device (e.g. 192.168.1.244).
Once you obtained the correct IP address, launch LiveGrade and you can proceed to add the BoxIO as a device:
The BoxIO possesses two separate processing chains and can be used in so called single- or dual-channel mode. You can learn more about the different modes on the FSI web page.
You can change the mode of the device via the BoxIO utility provided by FSI.
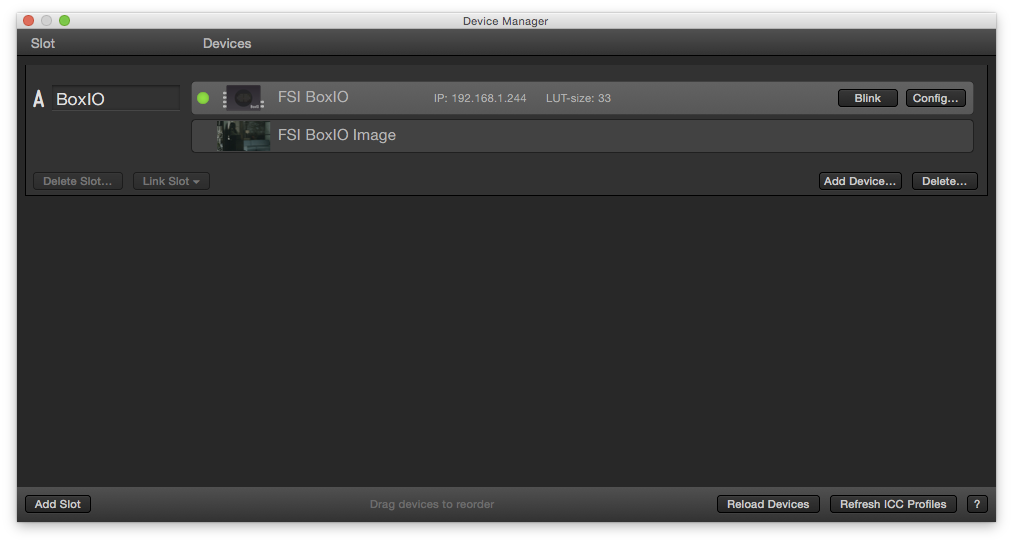
In single-channel mode LiveGrade will use BoxIO as a usual device and will add it to a slot:
Fig. 3: BoxIO in the Device Manager in single-channel mode.
In dual-channel mode BoxIO will generate two device instances named with “Ch. 1” (Channel 1) and “Ch. 2” (Channel 2) that will be added to successive slots in the Device Manager:
Fig. 4: BoxIO in the Device Manager in dual-channel mode.
Please be aware that you will have to re-add the BoxIO device after changing modes. When you changed the mode hit the refresh button in LiveGrade and see the device name indicate the status:
Image may be NSFW. Clik here to view.
Fig. 5: Grading slots
While transitioning from single-channel to dual-channel mode delete the BoxIO from the slot and add it again to see two channels populate. While transitioning from dual-channel to single-channel mode simply erase the second device (Channel 2) from the slot.
When initially connecting the device in dual channel mode you can switch back and forth between the two modes while always refreshing the devices. Switching into single-channel mode will activate channel one to work solely while channel two will immediately work again when switching to dual-channel mode and refreshing the devices in the slots in LiveGrade.
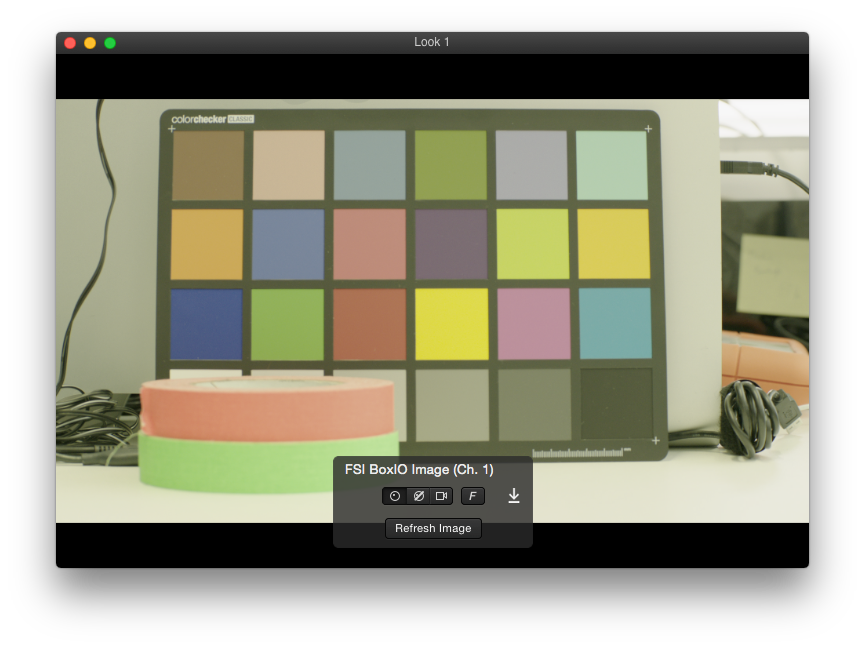
Getting the FSI BoxIO Image in LiveGrade
BoxIO is capable of taking a frame grab from the SDI signal that is connected to it.
In the main LiveGrade window, the FSI BoxIO is now displayed in the corresponding grading slot as a device, as well as the FSI BoxIO image as an Image Source of the slot:
figure 6: The FSI BoxIO’s image in the Image Viewer
In case that the live image has changed, you can update the image shown in LiveGrade by clicking on the «Refresh Image» button. After that you will have the latest frame of the live image.
You can generally check if the FSI BoxIO is properly connected by going to the Device Manager. A green indicator shows a positive connection status. You can use the «Blink» button to send a red-green-blue screen flash sequence to check if the BoxIO is ready for the use with LiveGrade.
FSI BoxIO can also be connected via Wifi. For best performance concerning fluid look interaction and frame grabs we recommend a tethered ethernet connection.
You can use ScopeBox by Divergent Media for software-based waveform and video scopes LiveGrade Pro’s Image View. ScopeBox offers a variety of waveform monitors and video scopes that enable image analysis and color control of the content in the LiveGrade Image View.
You can receive information about how to download, setup and license ScopeBox software on Divergent Media’s Website. To use the integration of LiveGrade Pro in ScopeBox you have to run version 3.5.3 or later of the ScopeBox application.
Connecting LiveGrade and ScopeBox via ScopeLink
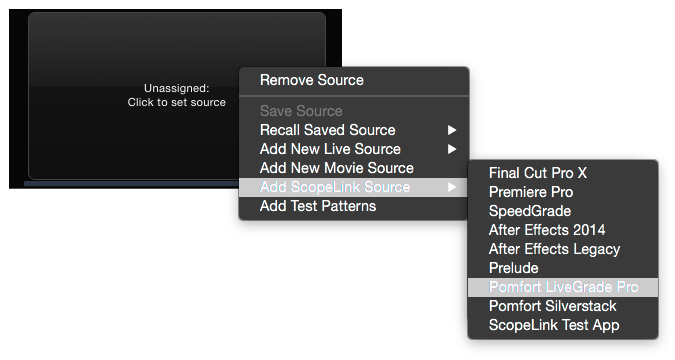
LiveGrade sends the current image of the player directly to the ScopeBox application by DivergentMedia’s ScopeLink technology. To enable ScopeLink open the ScopeBox application.
Click in the upper left area of the ScopeBox main window to set a new source. Choose “Add ScopeLink Source > Pomfort LiveGrade” from the context menu:
Figure 2: ScopeBox waiting for the LiveGrade connection.
If not already open, now open LiveGrade. Open the Image View.
Make sure that in the preferences of LiveGrade under “External Video” the checkbox “Connect to ScopeBox” is enabled. You reach the preferences from the Main Menu by choosing “LiveGrade > Preferences…”:
Figure 4: ScopeBox Preference in the External Video tab
There you can also choose if you want to reduce the number of updates per second. Checking this box reduces the required computing resources for the ScopeBox integration.
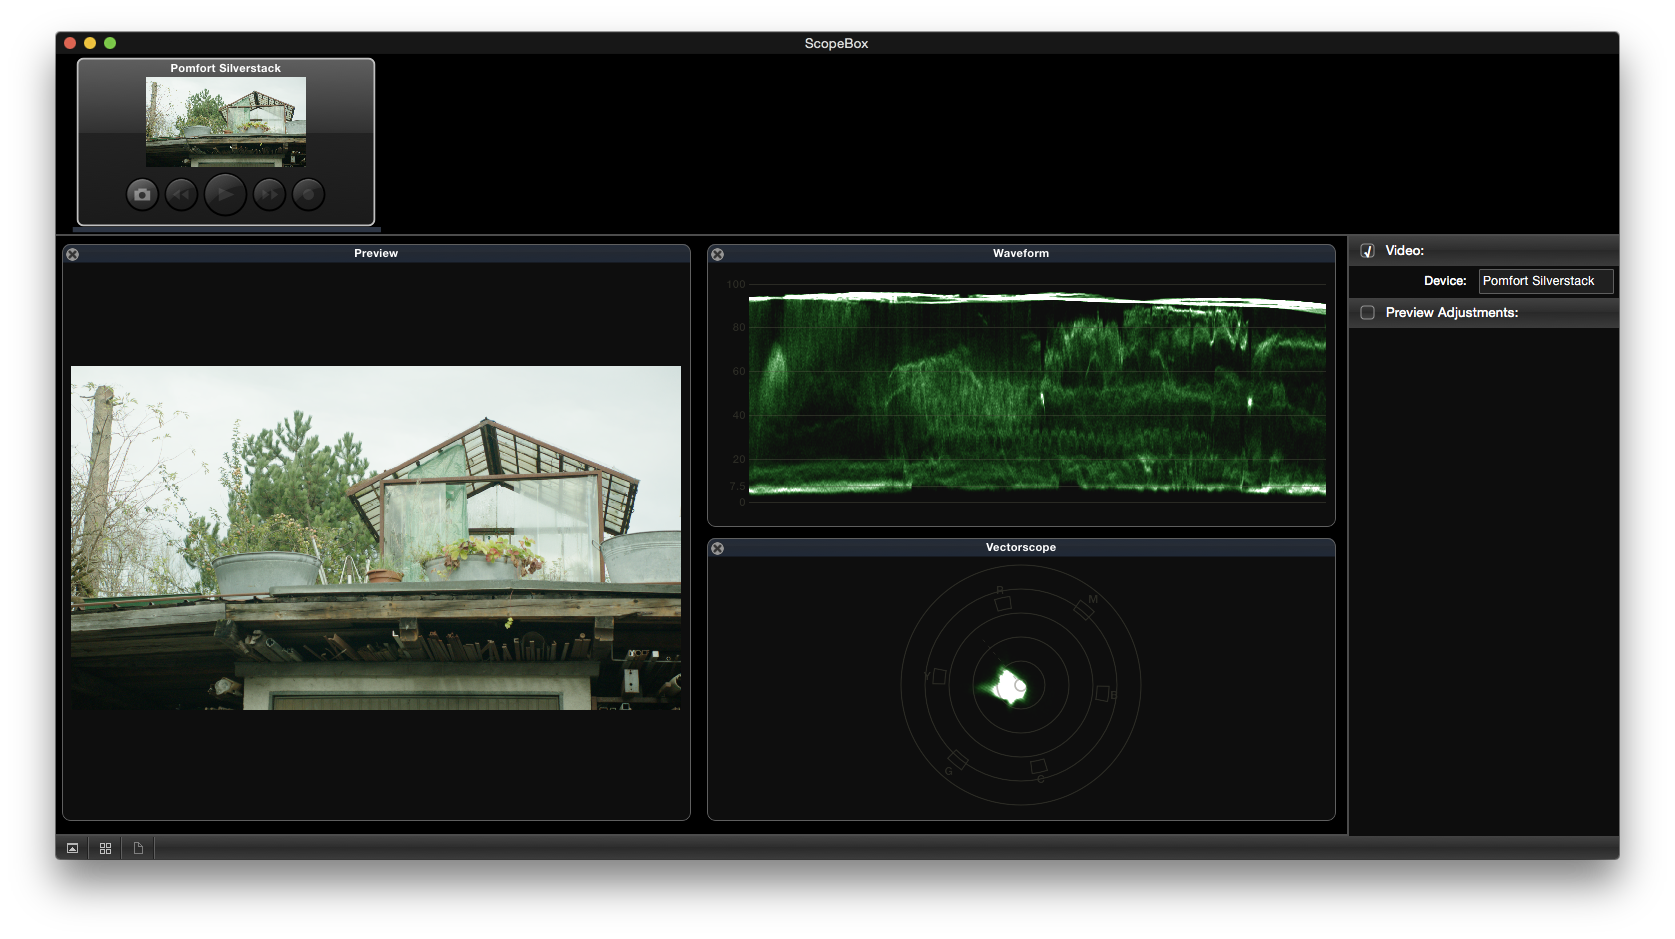
When you switch to ScopeBox you should then see the default view including an image preview of the image showing in the LiveGrade Image View:
Figure 3: The ScopeBox UI showing the image of the LiveGrade Image View and scopes.
Please be aware that the LiveGrade Image Viewer has to be open to send the current image to Scopebox. Closing the Image Viewer in LiveGrade will continue showing the last frame in Scopebox. When reopening the Image Viewer, Scopebox will refresh the input with the current image from LiveGrade.
Learn how to use ScopeBox with this tutorial (from Divergent Media):
Find more tutorial videos from Divergent Media about ScopeBox here.
Because of LiveGrade’s internal RGB processing, signals from of YCbCr based clips sent to ScopeBox via ScopeLink don’t contain code values outside the legal range (even if they might be present in the source files).
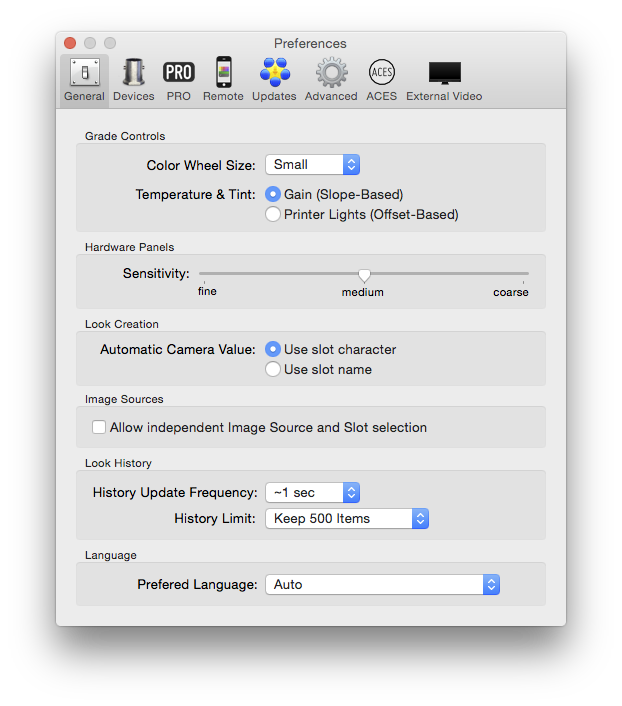
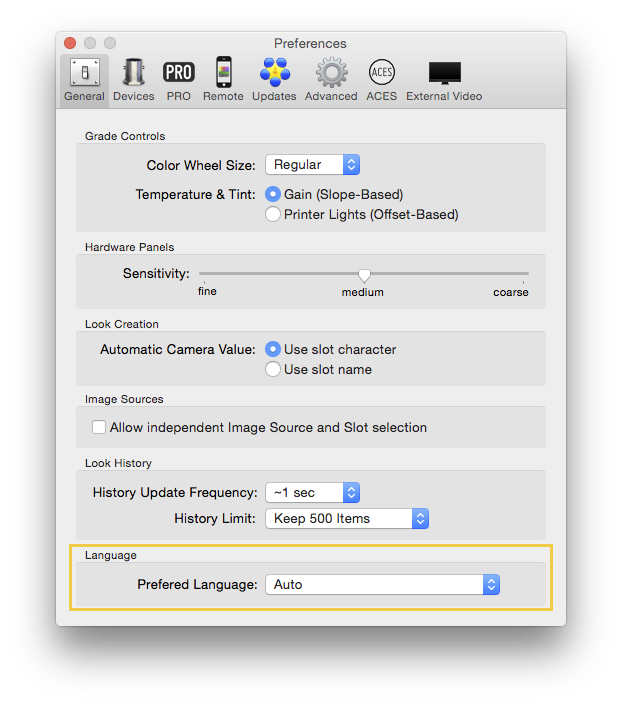
LiveGrade offers the possibility to change the language for the User Interface independently from the setting for Mac OS X.
To do so open the preferences. Go to the Main Menu and choose “LiveGrade > Preferences…”. In the “General” tab of the preferences you will find the section “Language” right at the bottom:
Silverstack XT has the capability of reproducing ACES workflows. Six different versions of the ACES workflows are available from the Preferences panel: v. 1.0.2, v. 1.0.2, v 1.0.0, v 0.7.1, v 0.7.0 and v 0.2.0 (see fig. 2). These six ACES versions have different IDTs (Input Device Transforms) and ODTs (Output Device Transforms). Please, make sure that the ACES version used in Silverstack XT matches the one used during the post production process for maximum color accuracy.
The grading nodes displayed in the ACES mode are divided in two parts:
ACES color transformation panel
CDL controls
Additionally, Silverstack XT offers the ACES CDL Advanced grading mode. This grading mode lets you add multiple grading nodes between the IDT and ODT for advanced workflows.
Managing ACES Versions
In the Silverstack preferences you can manage the available ACES versions and transforms:
The dropdown lets you select the ACES version for new looks. Every new look will be initialized with the ACES version selected in the dropdown in the preferences.
That means that every look in the library made with an ACES grading mode has an associated ACES version (you can find that version in the “ACES Mode” column in the Silverstack library). Saving looks with different ACES versions to the library will make it easy to compare the look of different ACES versions effortlessly.
In the section “Available ACES Transforms” you can find the available ACES versions and its associated transforms. The icon in the status bar will either signalize an available set of transforms (green checkmark) or a set of transforms that can be downloaded from the servers (download icon with downwards arrow).
Click the button “Check for New Versions” at the bottom of the preferences window to see if new ACES versions are available to download from the Pomfort servers.
Supported ACES IDT and ODT formats
Before starting to create your grades, select the correct IDT (matching your camera system) and the ODT (matching the output display color space) from the color transformation panel. LiveGrade Pro currently offers the following set of IDTs and ODTs:
ACEScc v. 1.0.2
IDT
AMPAS
ACESproxy v1.0.1/1.0.2
Reverse Rec.709 (ODT) v1.0.1/1.0.2
ARRI
Alexa Log-C EI800 v3
Canon
EOS C100 (A) D55 v1.0
EOS C100 (A) Tungsten v1.0
EOS C300 (A) D55 v1.0
EOS C300 (A) Tungsten v1.0
EOS C300 mkII CanonLog2 BT2020(B) D55 v1.0
EOS C300 mkII CanonLog2 BT2020(B) Tungsten v1.0
EOS C300 mkII CanonLog2 CinemaGamut(A) D55 v1.0
EOS C300 mkII CanonLog2 CinemaGamut(A) Tungsten v1.0
EOS C300 mkII CanonLog BT2020(D) D55 v1.0
EOS C300 mkII CanonLog BT2020(D) Tungsten v1.0
EOS C300 mkII CanonLog CinemaGamut(C) D55 v1.0
EOS C300 mkII CanonLog CinemaGamut(C) Tungsten v1.0
EOS C500 CinemaGamut(A) D55 v1.1.1
EOS C500 CinemaGamut(A) Tungsten v1.1.1
EOS C500 DCI-P3 D55 v1.1.1
EOS C500 DCI-P3 Tungsten v1.1.1
Panasonic
V35 v070
Sony
F35 Slog1
F55/F65 Slog2 Daylight
F55/F65 Slog2 Tungsten
ODT
AMPAS
P3 ST2084 D60 1000nits v1.0.1/1.0.2
P3 ST2084 D60 2000nits v1.0.1/1.0.2
P3 ST2084 D60 4000nits v1.0.1/1.0.2
P3 v1.0.1/1.0.2
Rec.2020 100nits (dim) v1.0.1/1.0.2
Rec.2020 ST2084 1000nits v1.0.1/1.0.2
Rec.709 100nits v1.0.1/1.0.2
ACEScc v. 1.0.1
IDT
AMPAS
ACESproxy v1.0.1
Reverse Rec.709 (ODT) v1.0.1
ARRI
Alexa Log-C EI800 v3
Canon
EOS C100 (A) D55 v1.0
EOS C100 (A) Tungsten v1.0
EOS C300 (A) D55 v1.0
EOS C300 (A) Tungsten v1.0
EOS C300 mkII CanonLog2 BT2020(B) D55 v1.0
EOS C300 mkII CanonLog2 BT2020(B) Tungsten v1.0
EOS C300 mkII CanonLog2 CinemaGamut(A) D55 v1.0
EOS C300 mkII CanonLog2 CinemaGamut(A) Tungsten v1.0
EOS C300 mkII CanonLog BT2020(D) D55 v1.0
EOS C300 mkII CanonLog BT2020(D) Tungsten v1.0
EOS C300 mkII CanonLog CinemaGamut(C) D55 v1.0
EOS C300 mkII CanonLog CinemaGamut(C) Tungsten v1.0
EOS C500 CinemaGamut(A) D55 v1.1.1
EOS C500 CinemaGamut(A) Tungsten v1.1.1
EOS C500 DCI-P3 D55 v1.1.1
EOS C500 DCI-P3 Tungsten v1.1.1
Panasonic
V35 v070
Sony
F35 Slog1
F55/F65 Slog2 Daylight
F55/F65 Slog2 Tungsten
ODT
AMPAS
P3 v1.0.1
Rec.2020 100nits (dim) v1.0.1
Rec.709 100nits v1.0.1
ACESlog v. 1.0.0
IDT
ACESproxy (ACESlog v. 1.0.0)
Alexa v3 EI800 (ACESlog v. 1.0.0)
Canon EOS C300 mkII CanonLog BT2020(D) D55 v. 1.0
Canon EOS C300 mkII CanonLog BT2020(D) Tungsten v. 1.0
Canon EOS C300 mkII CanonLog CinemaGamut(C) D55 v. 1.0
Canon EOS C300 mkII CanonLog CinemaGamut(C) Tungsten v. 1.0
Canon EOS C300 mkII CanonLog2 BT2020(B) D55 v. 1.0
Canon EOS C300 mkII CanonLog2 BT2020(B) Tungsten v. 1.0
Canon EOS C300 mkII CanonLog2 CinemaGamut(A) D55 v. 1.0
Canon EOS C300 mkII CanonLog2 CinemaGamut(A) Tungsten v. 1.0
Canon EOS CinemaGamut(A) D55 (ACESlog v. 1.0.0)
Canon EOS CinemaGamut(A) Tungsten (ACESlog v. 1.0.0)
Canon EOS DCI-P3 D55 (ACESlog v. 1.0.0)
Canon EOSDCI-P3 Tungsten (ACESlog v. 1.0.0)
Panasonic V35 v070 (ACESlog v. 1.0.0)
Reverse Rec.709 (ODT) (ACESlog v. 1.0.0)
Sony Slog1 (F35) (ACESlog v. 1.0.0)
Sony Slog2 (F55/F65) Daylight (ACESlog v. 1.0.0)
Sony Slog2 (F55/F65) Tungsten (ACESlog v. 1.0.0)
ODT
P3
Rec.2020 100nits dim (ACESlog v. 1.0.0)
Rec.709 100nits (ACESlog v. 1.0.0)
ACESlog v. 0.7.1
IDT
Alexa v3 EI800 (ACESlog v. 0.7.1)
Canon EOS CinemaGamut(A) D55 v1.1 (ACESlog v. 0.7.1)
Canon EOS CinemaGamut(A) Tungsten v1.1 (ACESlog v. 0.7.1)
Canon EOS DCI-P3 D55 v1.1 (ACESlog v. 0.7.1)
Canon EOSDCI-P3 Tungsten v1.1 (ACESlog v. 0.7.1)
Panasonic V35 v070 (ACESlog v. 0.7.1)
Sony Slog1 (F35) (ACESlog v. 0.7.1)
Sony Slog2 (F55/F65) Daylight (ACESlog v. 0.7.1)
Sony Slog2 (F55/F65) Tungsten (ACESlog v. 0.7.1)
ODT
P3 (ACESlog v. 0.7.1)
Rec.709 (ACESlog v. 0.7.1)
ACESlog v. 0.7.0
IDT
Alexa
Canon EOS CinemaGamut(A) D55 v1.1
Canon EOS CinemaGamut(A) Tungsten v1.1
Canon EOS DCI-P3+A D55 v1.1
Canon EOS DCI-P3+A Tungsten v1.1
Panasonic Varicam 35
Sony F35
Sony F55 Daylight
Sony F55 Tungsten
ODT
Rec. 709
DCI-P3
ACESlog v. 0.2.0
IDT
Alexa
Sony
ODT
Rec. 709
DCI-P3
The CDL controls behave the same way as in the CDL Grade mode and can also be exported as usual from a saved grade. ACES grades can also be exported as 3D LUTs, including the CDL values, IDT and ODT.
LiveGrade Pro comes with support for remote look control of the SONY F65 cinema camera. This feature enables the user to control the ASC-CDL values inside the SONY F65 that affect the look of the SDI1 output signal of the camera. LiveGrade Pro is connected to the SONY F65 via a network connection (LAN or WiFi depending on your setup).
Content
This article will…
…tell you how to set up the network settings in the camera to connect to LiveGrade Pro.
…point out how to set the look configuration in the camera to work with LiveGrade Pro.
…guide through the process of adding the SONY F65 as a device in LiveGrade.
…describe how to export a compatible 3D LUT from LiveGrade and load it into the F65.
Setting Up the SONY F65 Network Connection
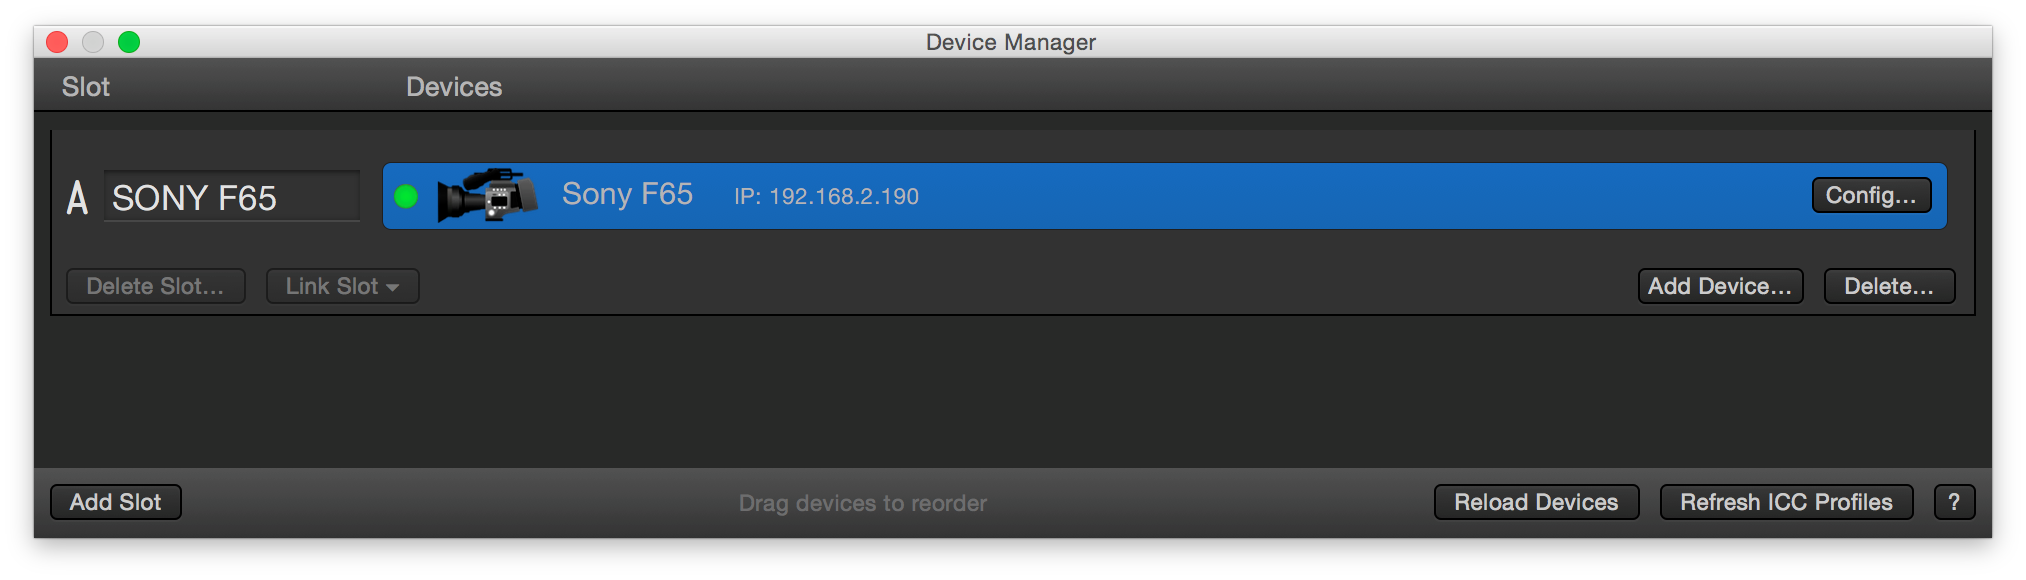
In order to exchange look information with LiveGrade Pro, the SONY F65 camera needs to have a working network connection with the Mac where LiveGrade is running on.
The SONY F65 is capable of using DHCP to set its IP address automatically. Go to the “Network” settings of the camera and enable DHCP:
If not using DHCP, configure the IP and subnet mask manually for the Mac and the SONY F65 to be in the same network.
The shown IP address in the network settings of the camera (in this case 192.168.2.190, see fig. 1) will be used in LiveGrade to connect to the F65.
Setting Up the Look Configuration of the SONY F65
In order for the interactive control of the ASC-CDL values of the camera to work the color control of the SDI1 output of the F65 has to be set to a certain state.
The camera settings can be reached either directly on the camera to be output through the SDI or you can access them via a web interface. If the network settings are set up correctly you can access the web interface by entering the IP address of the camera into a web browser and hitting enter. Please note that those interfaces may have slightly different appearance.
In order to set the look settings of the camera for the use with LiveGrade Pro follow these steps:
Make sure the “Process” is set as “1DLUT – CDL – 3D LUT”
At the entry “3D LUT“ choose the intended 3D LUT (in this case called “red”, see fig. 3). Scroll down to learn how to load a custom 3D LUT to the camera.
Make sure the “ASC-CDL” is set to “On”
Make sure the dropdown at “CDL” is set to “Edit Mode”
Please note that due to hardware limitations LiveGrade Pro is not capable of controlling the 3D LUT inside the SONY F65 as it is possible with other integrated devices in LiveGrade. Please read on to learn how to load a custom 3D LUT into the SONY F65 (see section “Export a Custom 3D LUT from LiveGrade to Load it to the SONY F65”).
Adding the SONY F65 Camera as a Device
Once the network and SDI look setup is finished you can add the SONY F65 to LiveGrade.
Enter the IP address of the camera as displayed in the camera settings. Hit “Add F65 Camera”.
Open the Device Manger in LiveGrade by clicking the button “Devices…” on the left side of the LiveGrade user interface. The Device Manager will show a connected SONY F65 camera:
LiveGrade Pro is now able to control the ASC-CDL values of the camera SDI1 output. Please refer to the article Using the CDL Grade Mode in LiveGrade for more information on grading controls in LiveGrade Pro.
Export a Custom 3D LUT from LiveGrade to Load it to the SONY F65
Please note that due to hardware limitations LiveGrade Pro is NOT capable of controlling the 3D LUT that is set inside the camera. However it is possible to load a custom 3D look up table to the camera via an SD card.
LiveGrade Pro is able to export a 3D LUT that is compatible with the SONY F65 (*.cube). Please refer to the article Exporting Grades to learn how to export 3D LUTs from LiveGrade.
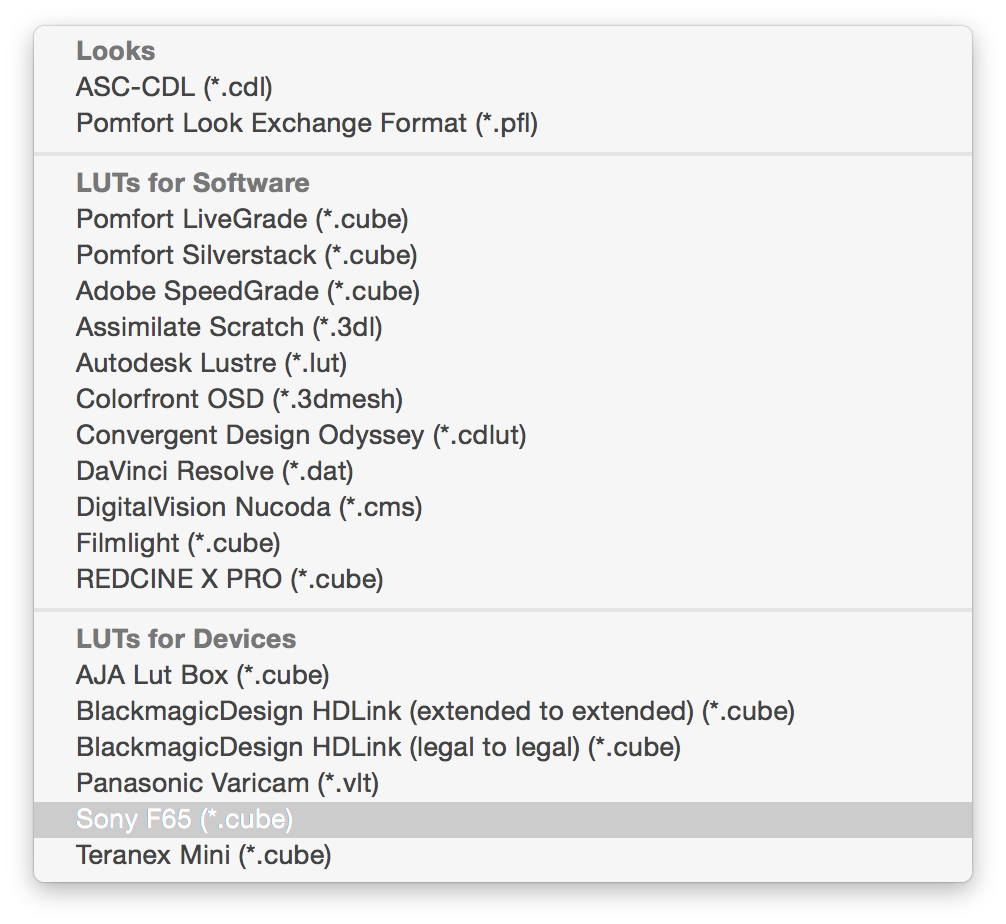
You will find an entry in the list called “SONY F65 (*.cube)”:
Put the SD card into your Mac. Inside the folder structure on the SD card copy the LUT you exported from LiveGrade into the “F65” folder that should be located inside the PRIVATE/SONY/PRO/CAMERA/ directory.
Insert the SD card into the camera again. You will be able to import the 3D LUT from the “File” > “1DLUT/3DLUT File” Menu:
Pomfort is an ACES Product Partner and is working with the Academy to ensure its products implement ACES according to Academy and SMPTE specifications.
Step-by-Step: How to Configure LiveGrade to Start Using ACES
1. Open the application.
2. Go to the the “ACES” section in the application preferences (Main Menu: “LiveGrade > Preferences…”) to set the ACES version for new looks.
3. Choose the Grading Mode “ACES CDL” by selecting it from the dropdown positioned on top of the grading interface next to the label “Look”.
4. Select the intended input and output transform for your setup depending on camera input and display output. That can be done inside of the IDT and ODT node of the grade.
5. You will now be able to preview and manipulate the image signal in the selected ACES working space.
Get in Touch
For any topics or request concerning Pomfort products working with ACES please contact support@pomfort.com.
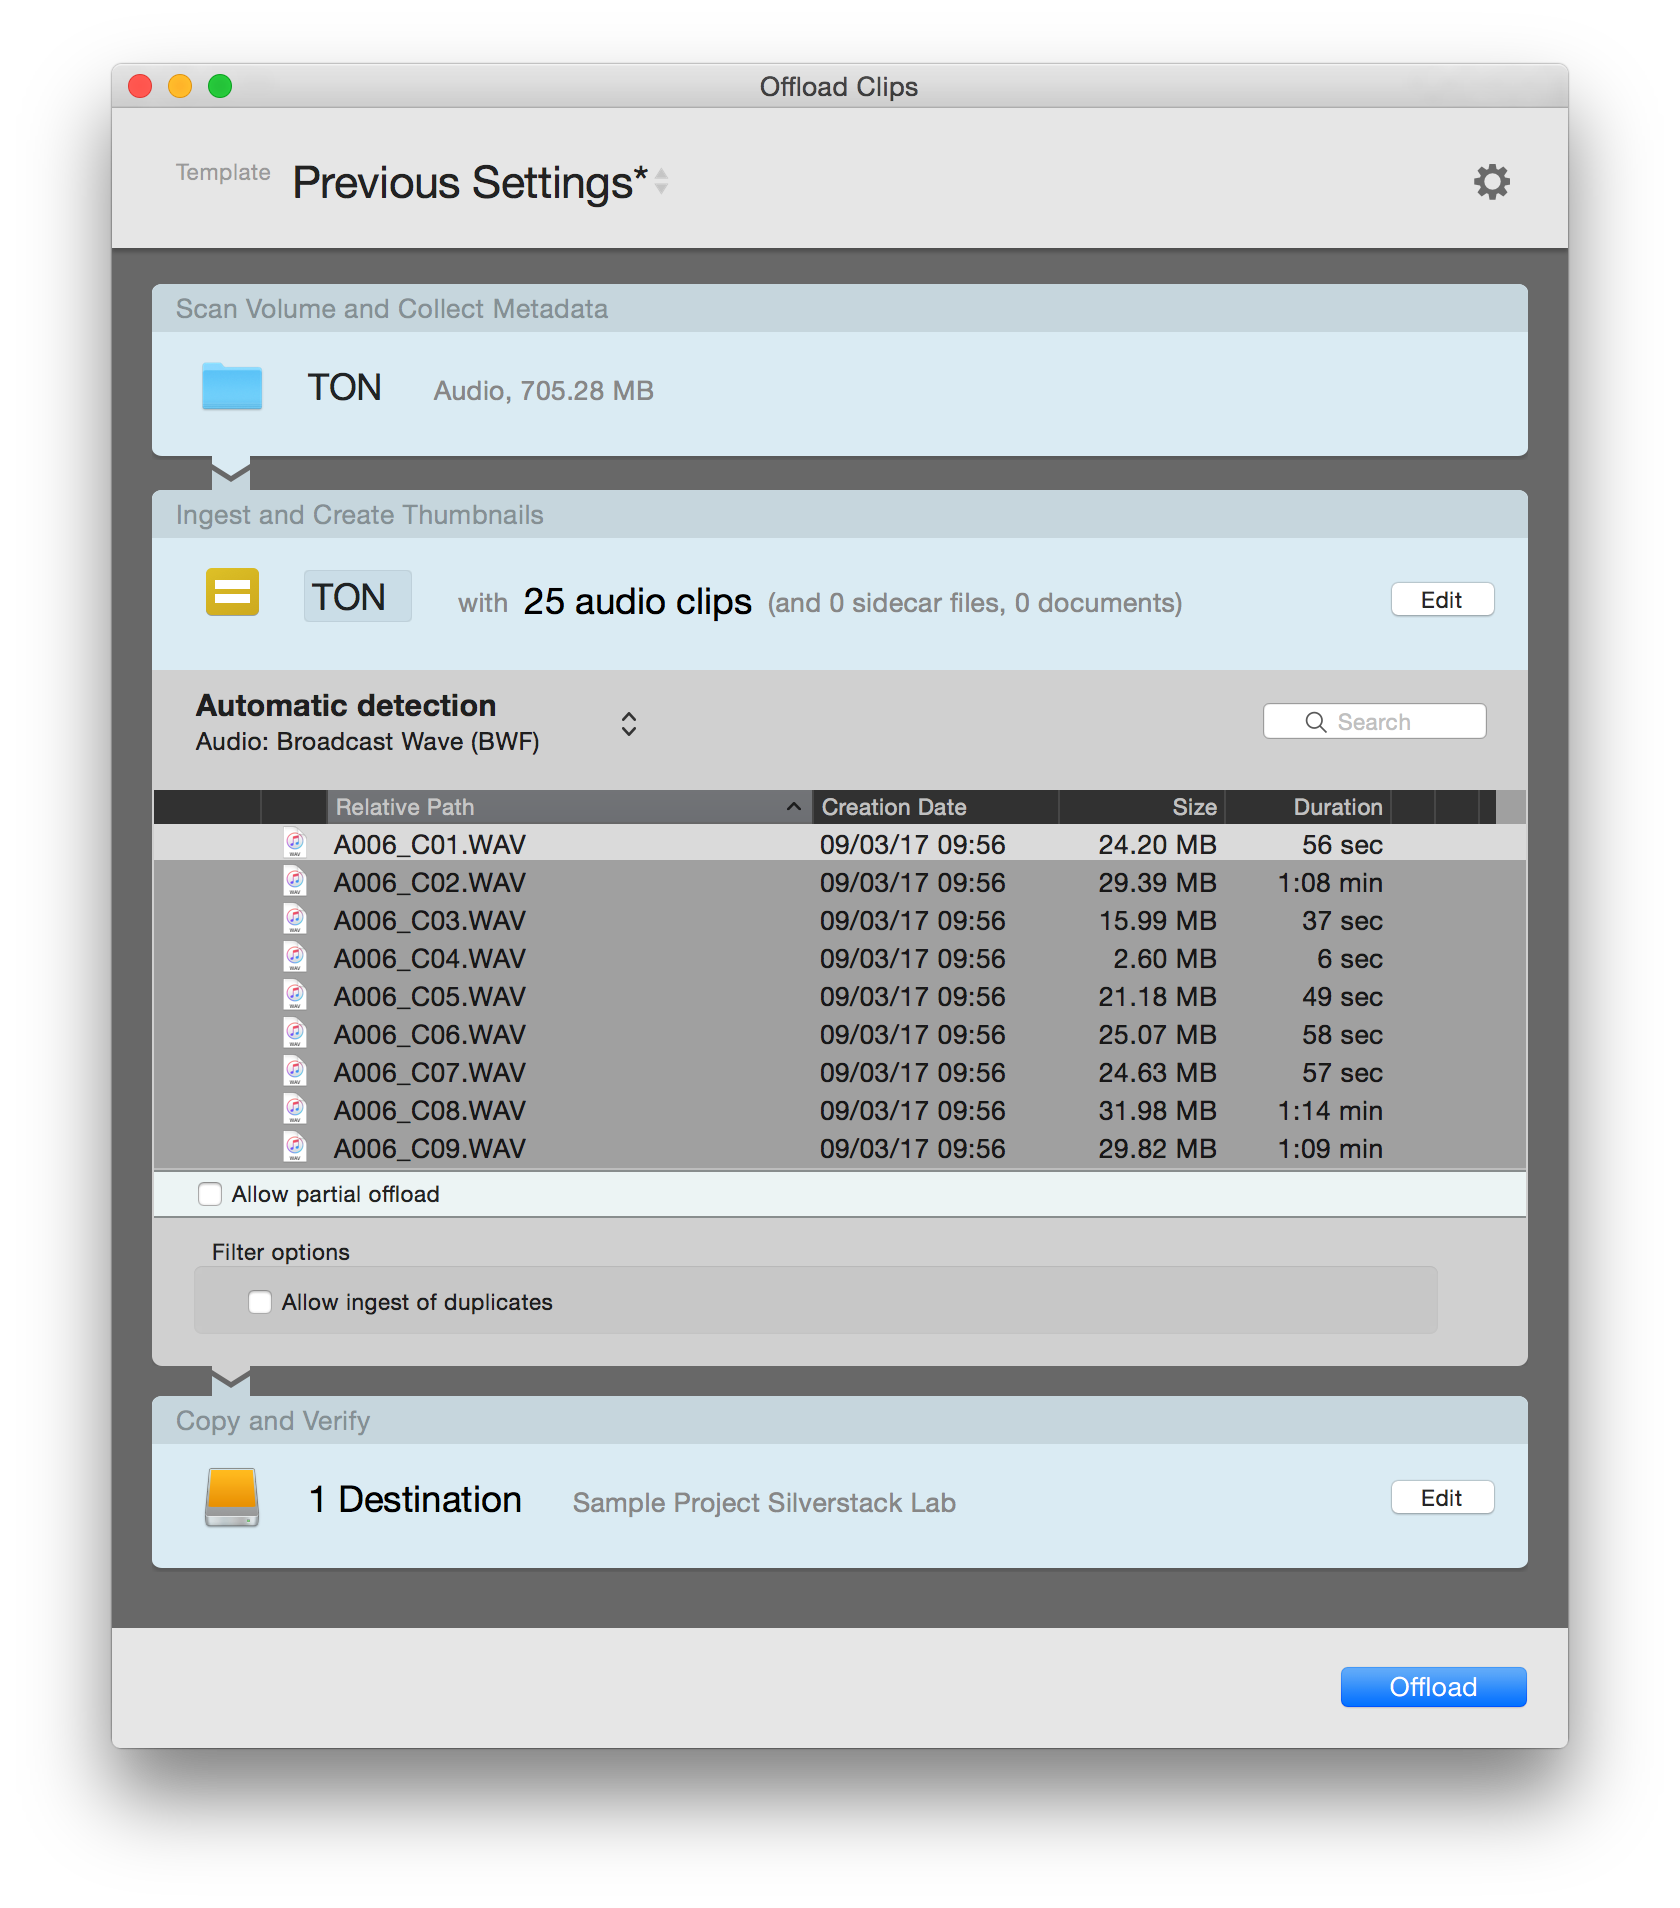
To ingest audio files into Silverstack click the “Offload” button in the upper left corner of the UI and choose the card or folder with the audio files to be offloaded. Audio files can be backed up within the audio wizard just as any other file type. Learn more about it in the article Parallel Offloading.
After starting the offload process Silverstack will register the audio clips in the library:
Silverstack will automatically detect .wav files that belong to the same clip and merges them together to an audio clip containing several audio tracks.
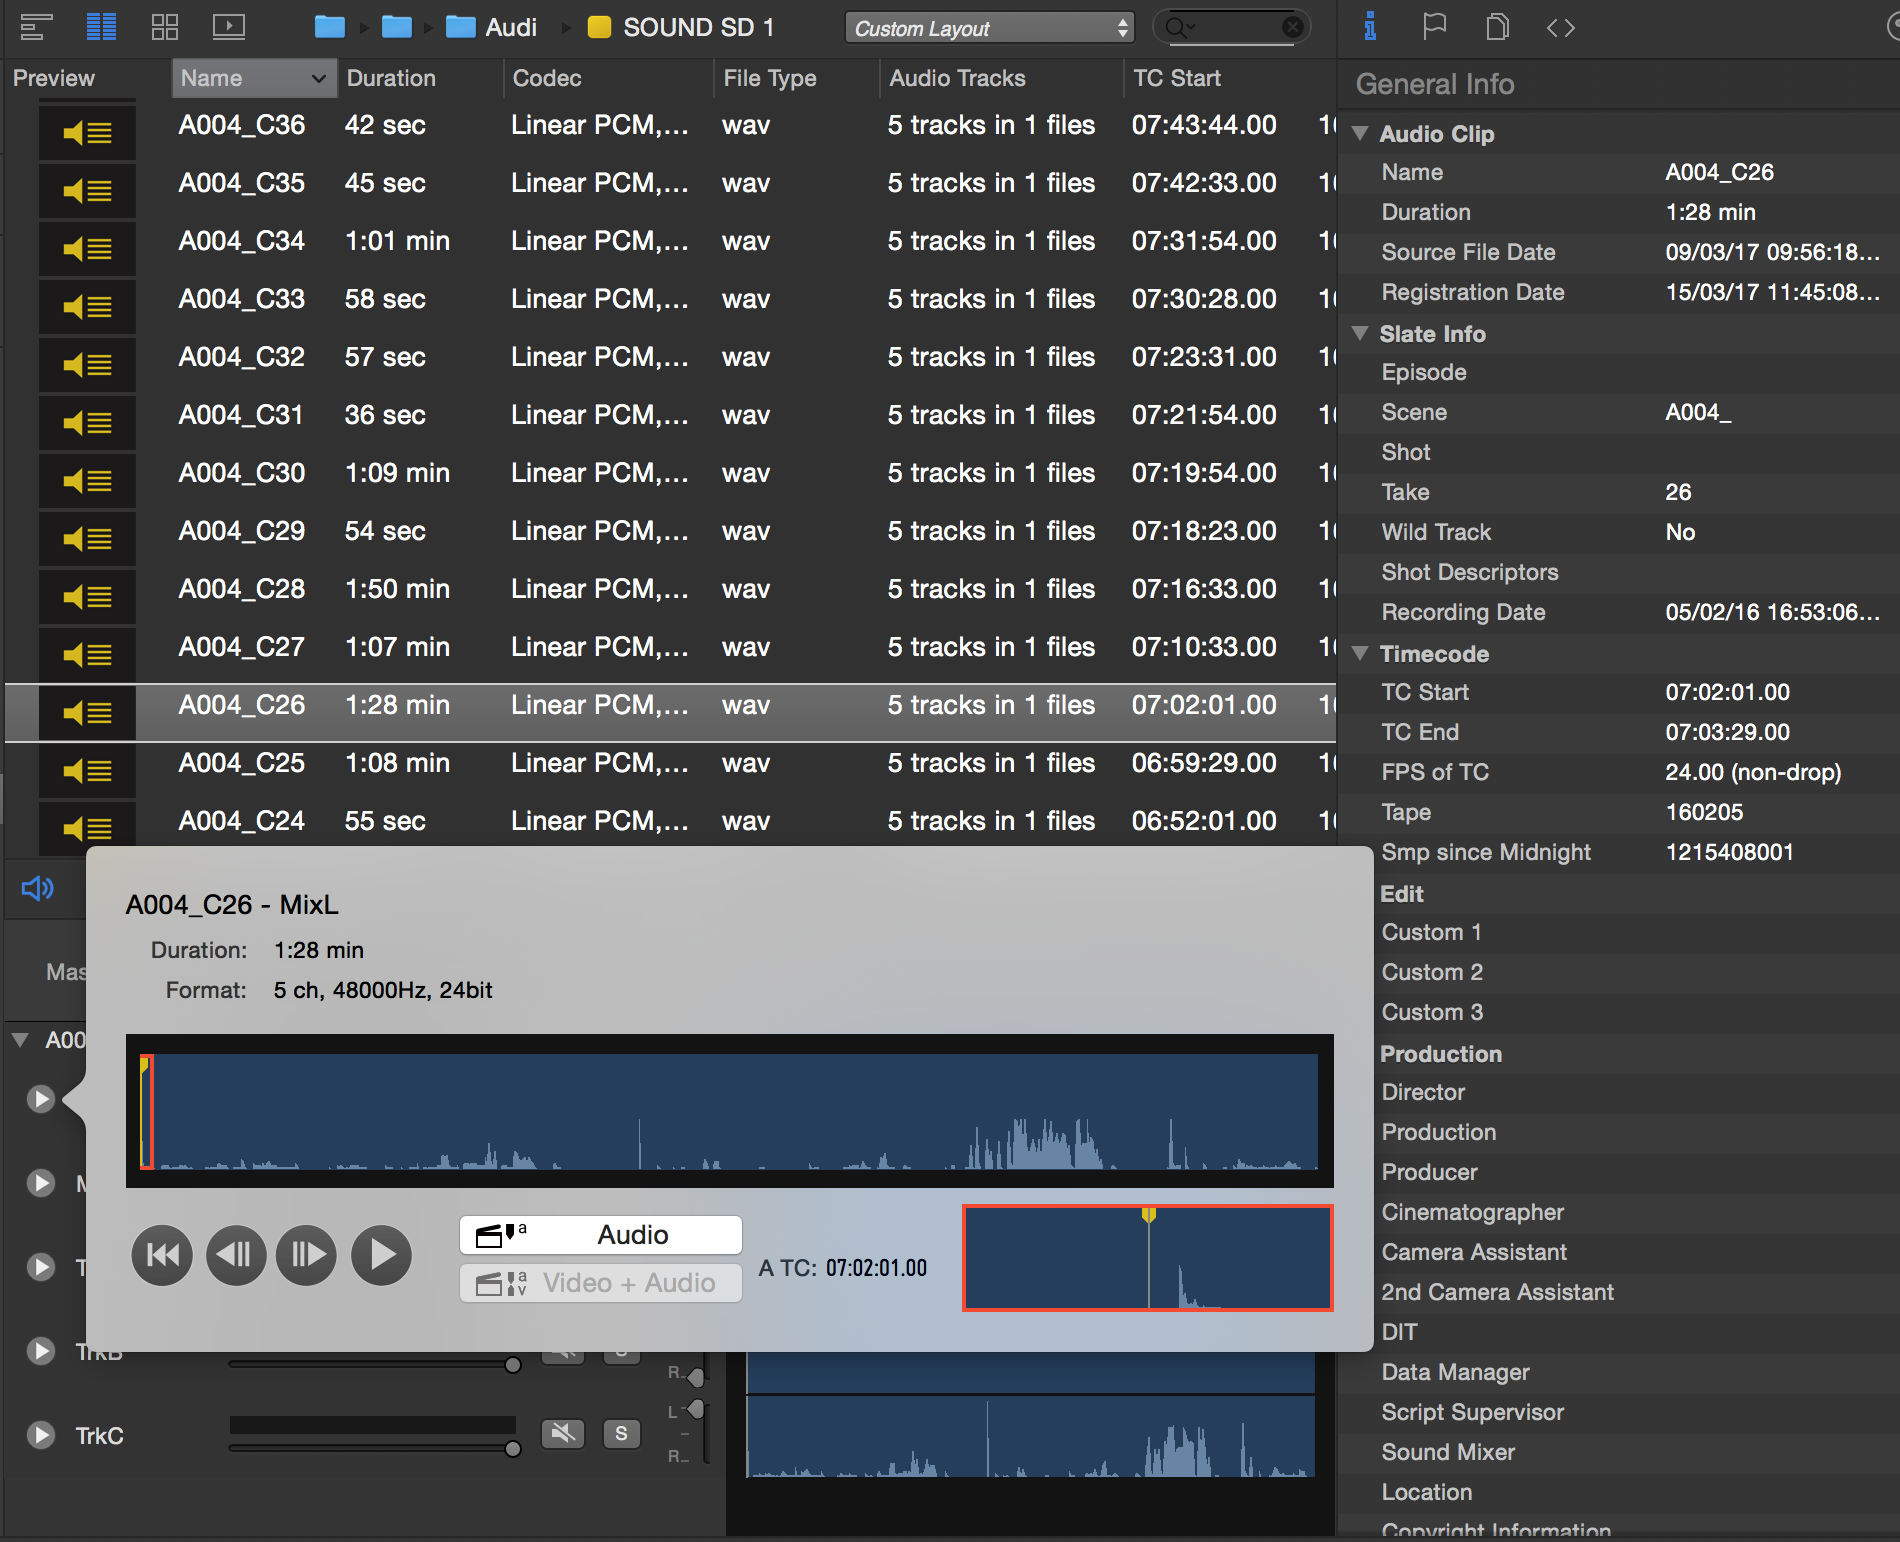
By opening the audio panel with the “Audio&Color” button in the toolbar all the audio tracks including waveform will be visible for the selected audio clip.
You can play audio clips back by clicking the play button.
The audio panel offers the following controls:
Master Volume: Controls the output signal level of the mix.
Audio meters: Represent the audio signal level during playback. There is a stereo Master meter and additional Channel meters — one for each audio track. The scale on top of the meters indicates the audio level in dB (dBFS). Peaking is represented by a bar in the according color of the peaking level that remains at the maximum position. You can reset the peak bar by clicking on the audio meters.
Channel mixers: The sliders control the signal level for each track. You can mute specific «Left» and «Right» tracks by disabling the check boxes on the right of the channel mixers.
Mute button: Mutes the according audio channel or the complete audio clip section
Solo button: Solos the according audio channel, as long as the button is pressed
Pan control: Sets the panorama to left, middle or right
The audio tracks panel can be opened from the small play button on the left side of the track name. It enables the playback of a single audio channel*:
Fig. 3: The audio tracks panel with single audio track playback
Audio Clips Metadata
Audio clips in Silverstack own a special set of metadata that is shown in the General Info tab of the right bar. The following metadata will be pulled from the audio file metadata:
Scene – Shot – Take
Wild Track
Recorder Model
Recorder Device ID
Samples since Midnight
FPS of TC
TC Start
TC End
Tape
Recording Date
Audio Track Names
The extends this set showing additional metadata in the General Info tab of the right bar.
Adding Audio Clips as External Audio to Video Clips
Once ingested audio clips can be added to video clips as external audio either manually (Silverstack XT) or automatically (Silverstack Lab):
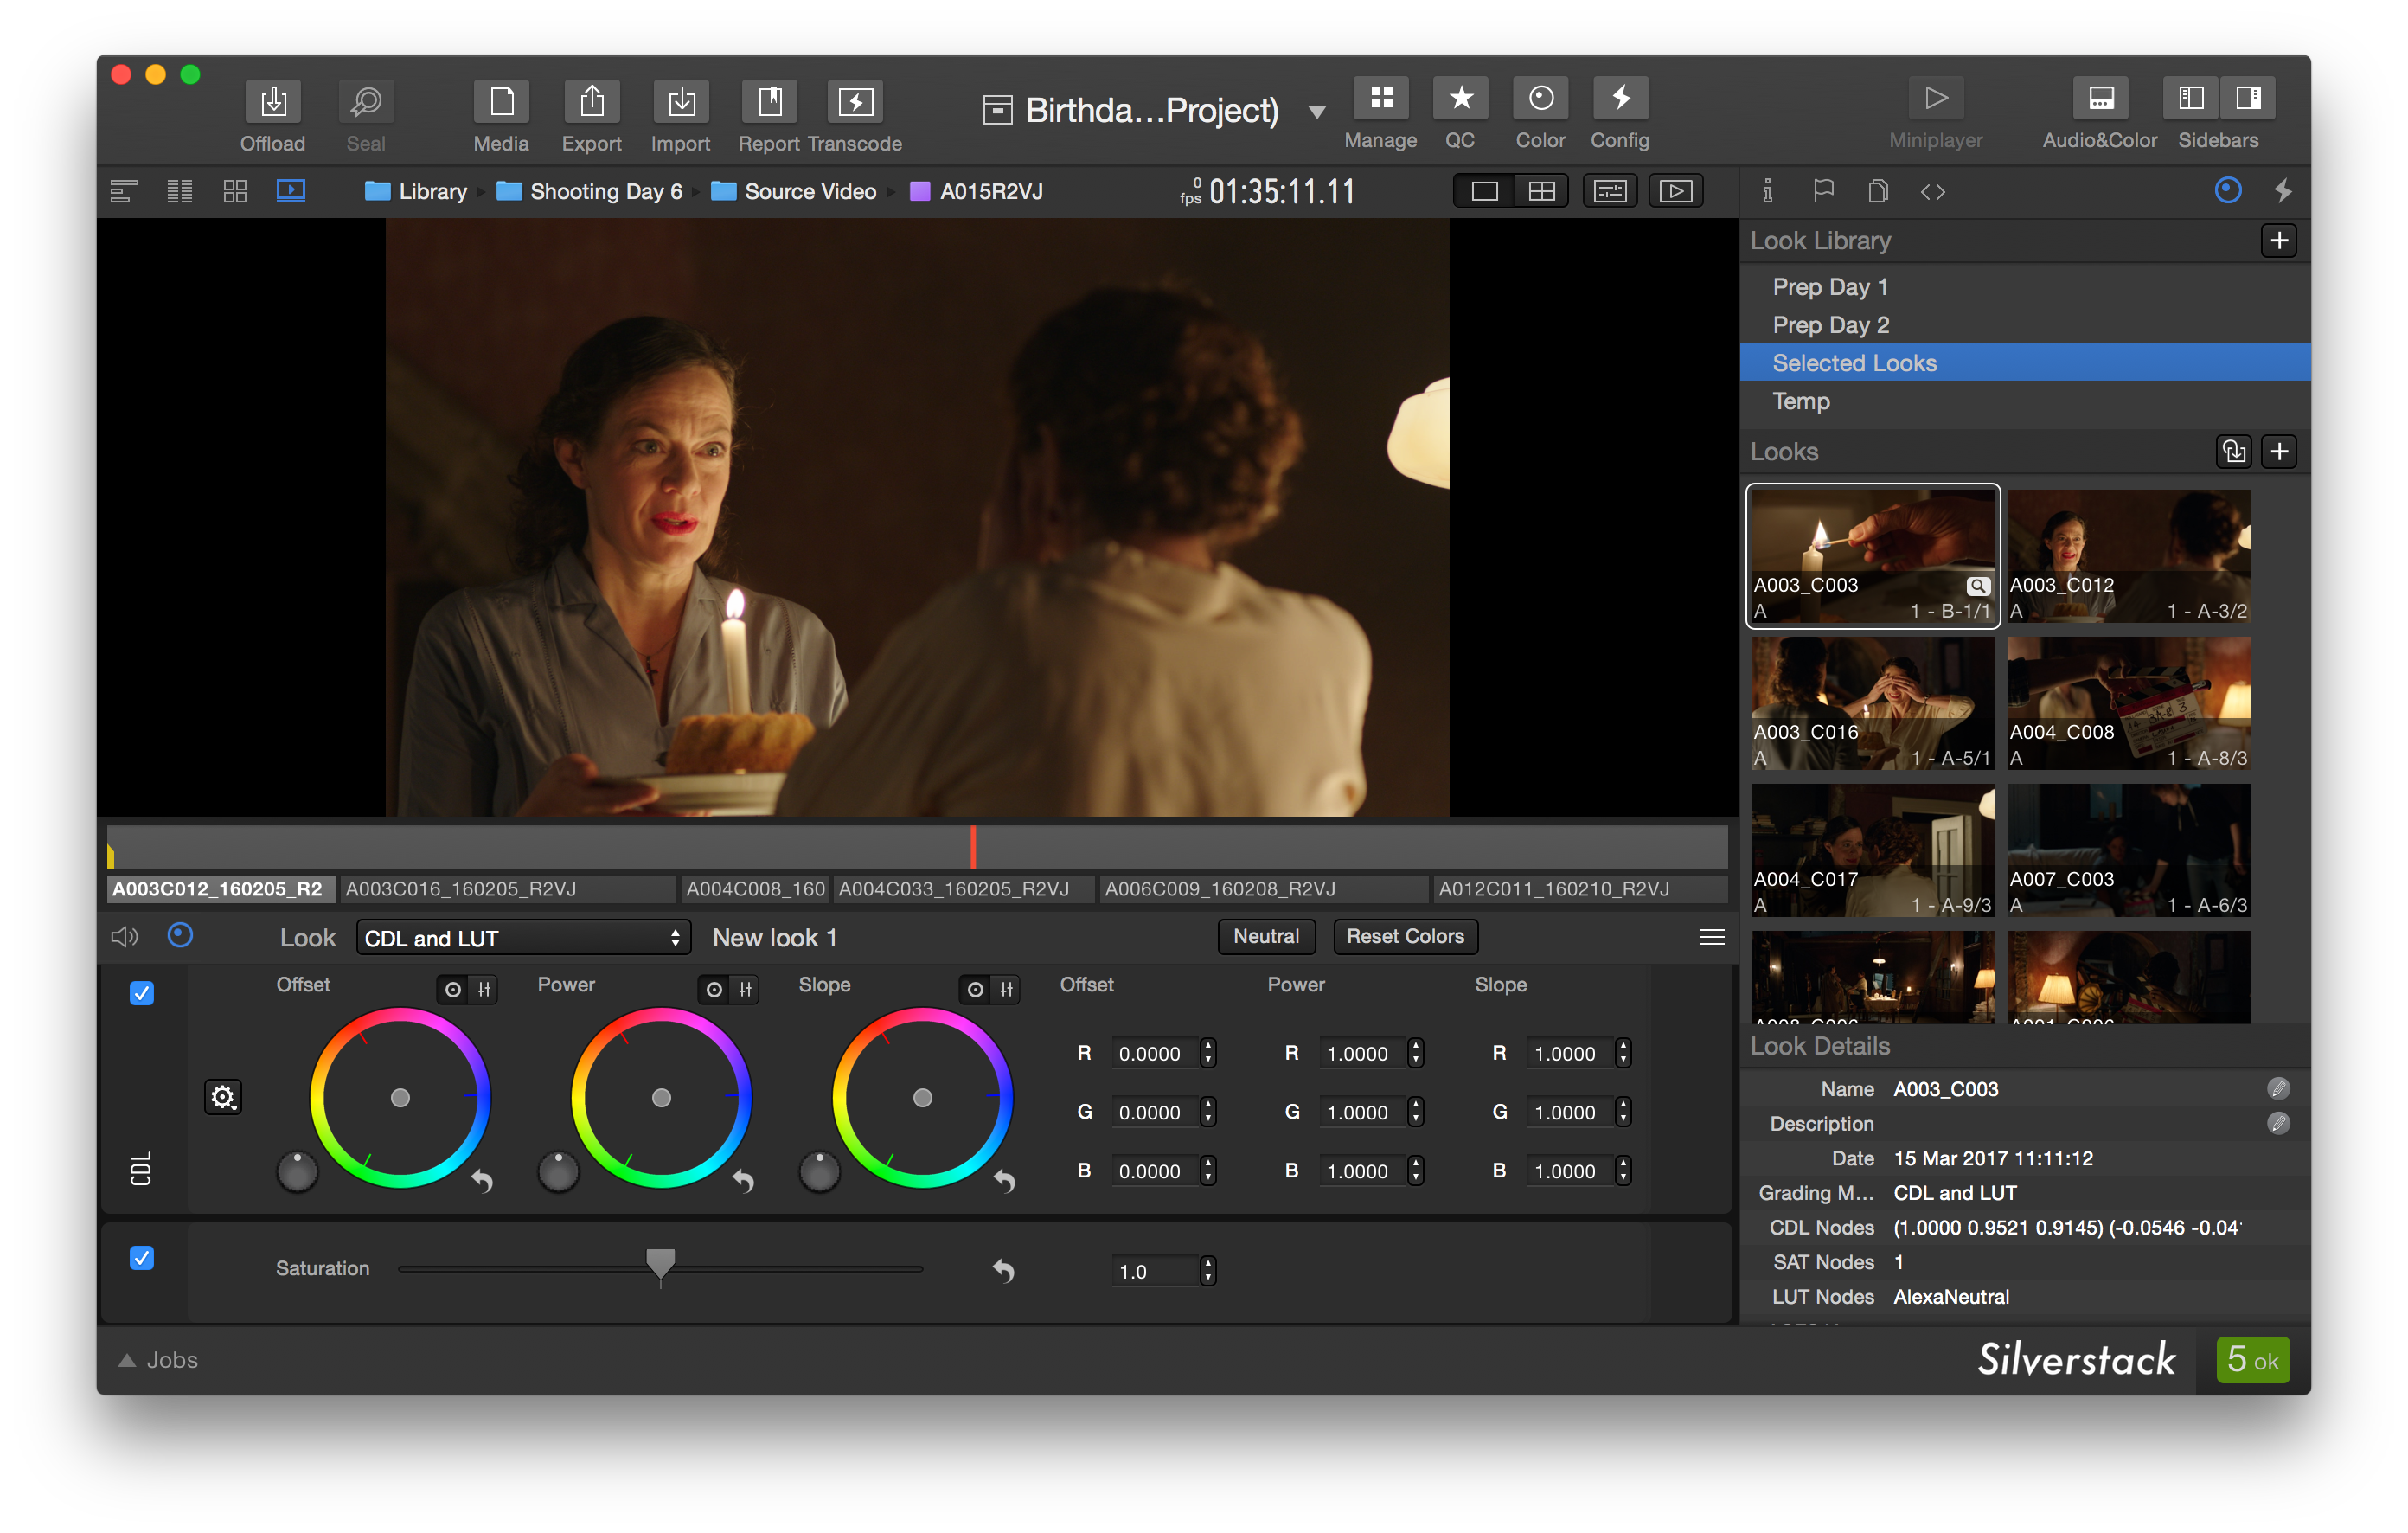
Silverstack comes with 3 to 4 options * to automatically configure the user interface in a steadily defined way. Like this you will be able to switch to a certain UI configuration that is convenient for a particular task with one click.
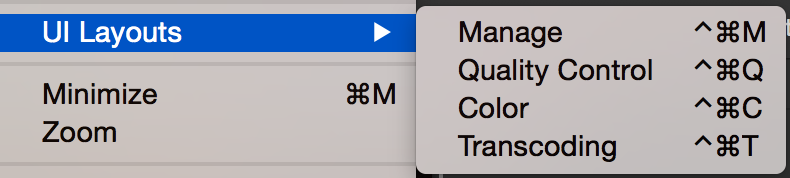
Accessing the UI Layouts
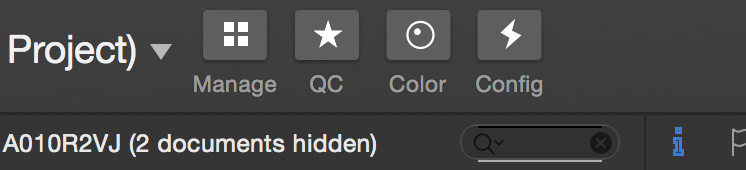
The UI Layouts include the following configurations:
Manage
QC (Quality Control)
Color
Config (Transcoding Configurations) *
The UI Layouts can be configured from the shortcut buttons on the right side of the Silverstack toolbar:
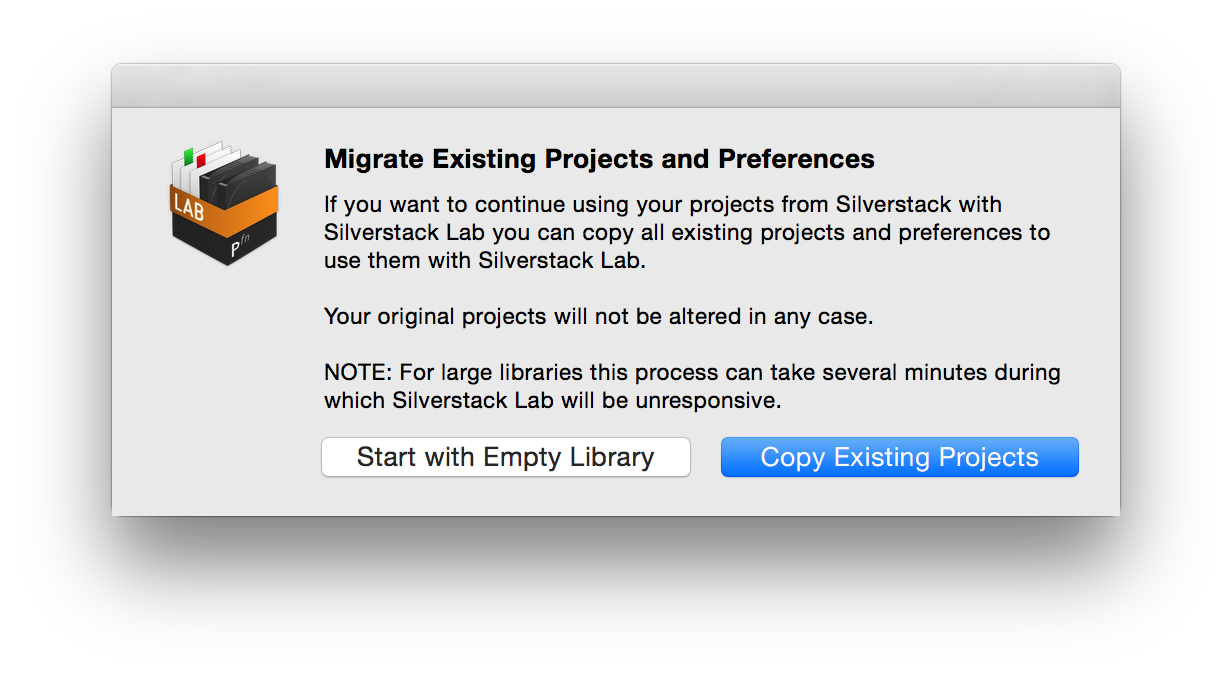
If you are a user of Silverstack 5 you might want to migrate your projects to Silverstack 6 or Silverstack Lab 6. There is an easy process to perform this migration.
Locating the Library Folders
Silverstack 6, Silverstack Lab 6 and Silverstack 5, have different library folders that contain the projects. You will find them at the following paths on your Mac:
You can also navigate to the folders from the Main Menu of Silverstack 5 or 6 or Lab 6. Select “Silverstack>Show Library in Finder” in the main menu bar at the top of the screen. This will open the project folder an bring you to the Silverstack.psdb file of your currently opened project. From there you can go two directories backwards to find yourself at the directory of the Silverstack library folders.
Migrating the Library
Close Silverstack 6 / Silverstack Lab 6
Rename the “Silverstack6” or “SilverstackLab6” folder in the directory /Users/[yourUser]/Library/Application Support/Pomfort/ to “Silverstack6_old”/“SilverstackLab6_old” (you will need that folder to keep new projects)
OpenSilverstack 6 / Silverstack Lab 6
Just like when you startedSilverstack 6 / Silverstack Lab 6 from scratch the first time you will be asked if you want to migrate your libraries from version 5 or want to start clean:
7. You can now use Silverstack 6 / Silverstack Lab 6 with your projects from Silverstack 5.
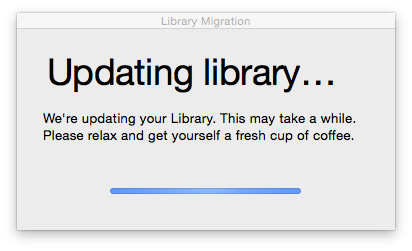
Please note that for large libraries the process can take several minutes. During that time Silverstack will become unresponsive. Leave the system running and the migration process will come to a solid finish.
Keeping Projects from Before the Migration
If you want to keep projects you created in Silverstack 5 before the migration process you can do that by copying the project folders:
Close Silverstack.
Go to the previously renamed “Silverstack6_old”/“SilverstackLab6_old” folder.
Select the projects you want to take over to your migrated Silverstack 6 / Silverstack Lab 6 library (projects folder usually are named like “Project-1F342864AF90”)
Copy them to the Silverstack6 / SilverstackLab6 folder that was automatically created during the migration.
Start Silverstack 6 / Silverstack Lab 6
You will then have all your migrated and the previously created projects in Silverstack 5 together at one place.
If you want you can then delete the“Silverstack6_old”/“SilverstackLab6_old” folder because now your current Silverstack 6 / Silverstack Lab 6 library contains all your projects from Silverstack 5 and 6 respectively Silverstack Lab 6.
You can also navigate to the folders from the Main Menu of Silverstack 6 or Lab 6. Select “Silverstack>Show Library in Finder” in the main menu bar at the top of the screen. This will open the project folder an bring you to the Silverstack.psdb file of your currently opened project. From there you can go two directories backwards to find yourself at the directory of the Silverstack library folders.
Migrating the Library
Close Silverstack 6
Rename the “SilverstackLab6” folder in the directory /Users/[yourUser]/Library/Application Support/Pomfort/ to “SilverstackLab6_old” (you will need that folder to keep new projects)
Open Silverstack Lab 6
Just like when you started Silverstack Lab 6 from scratch the first time you will be asked if you want to migrate your libraries from version 6 or want to start clean:
7. You can now use Silverstack Lab 6 with your projects from Silverstack 6.
Please note that for large libraries the process can take several minutes. During that time Silverstack will become unresponsive. Leave the system running and the migration process will come to a solid finish.
Keeping Projects from Before the Migration
If you want to keep projects you created in Silverstack 6 before the migration process you can do that by copying the project folders:
Close Silverstack.
Go to the previously renamed “SilverstackLab6_old” folder.
Select the projects you want to take over to your migrated Silverstack Lab 6 library (projects folder usually are named like “Project-1F342864AF90”)
Copy them to the Silverstack Lab 6 folder that was automatically created during the migration.
Start Silverstack Lab 6
You will then have all your migrated and the previously created projects in Silverstack Lab 6 together at one place.
If you want you can then delete the “SilverstackLab6_old” folder because now your current Silverstack Lab 6 library contains all your projects from Silverstack 6 and Silverstack Lab 6.
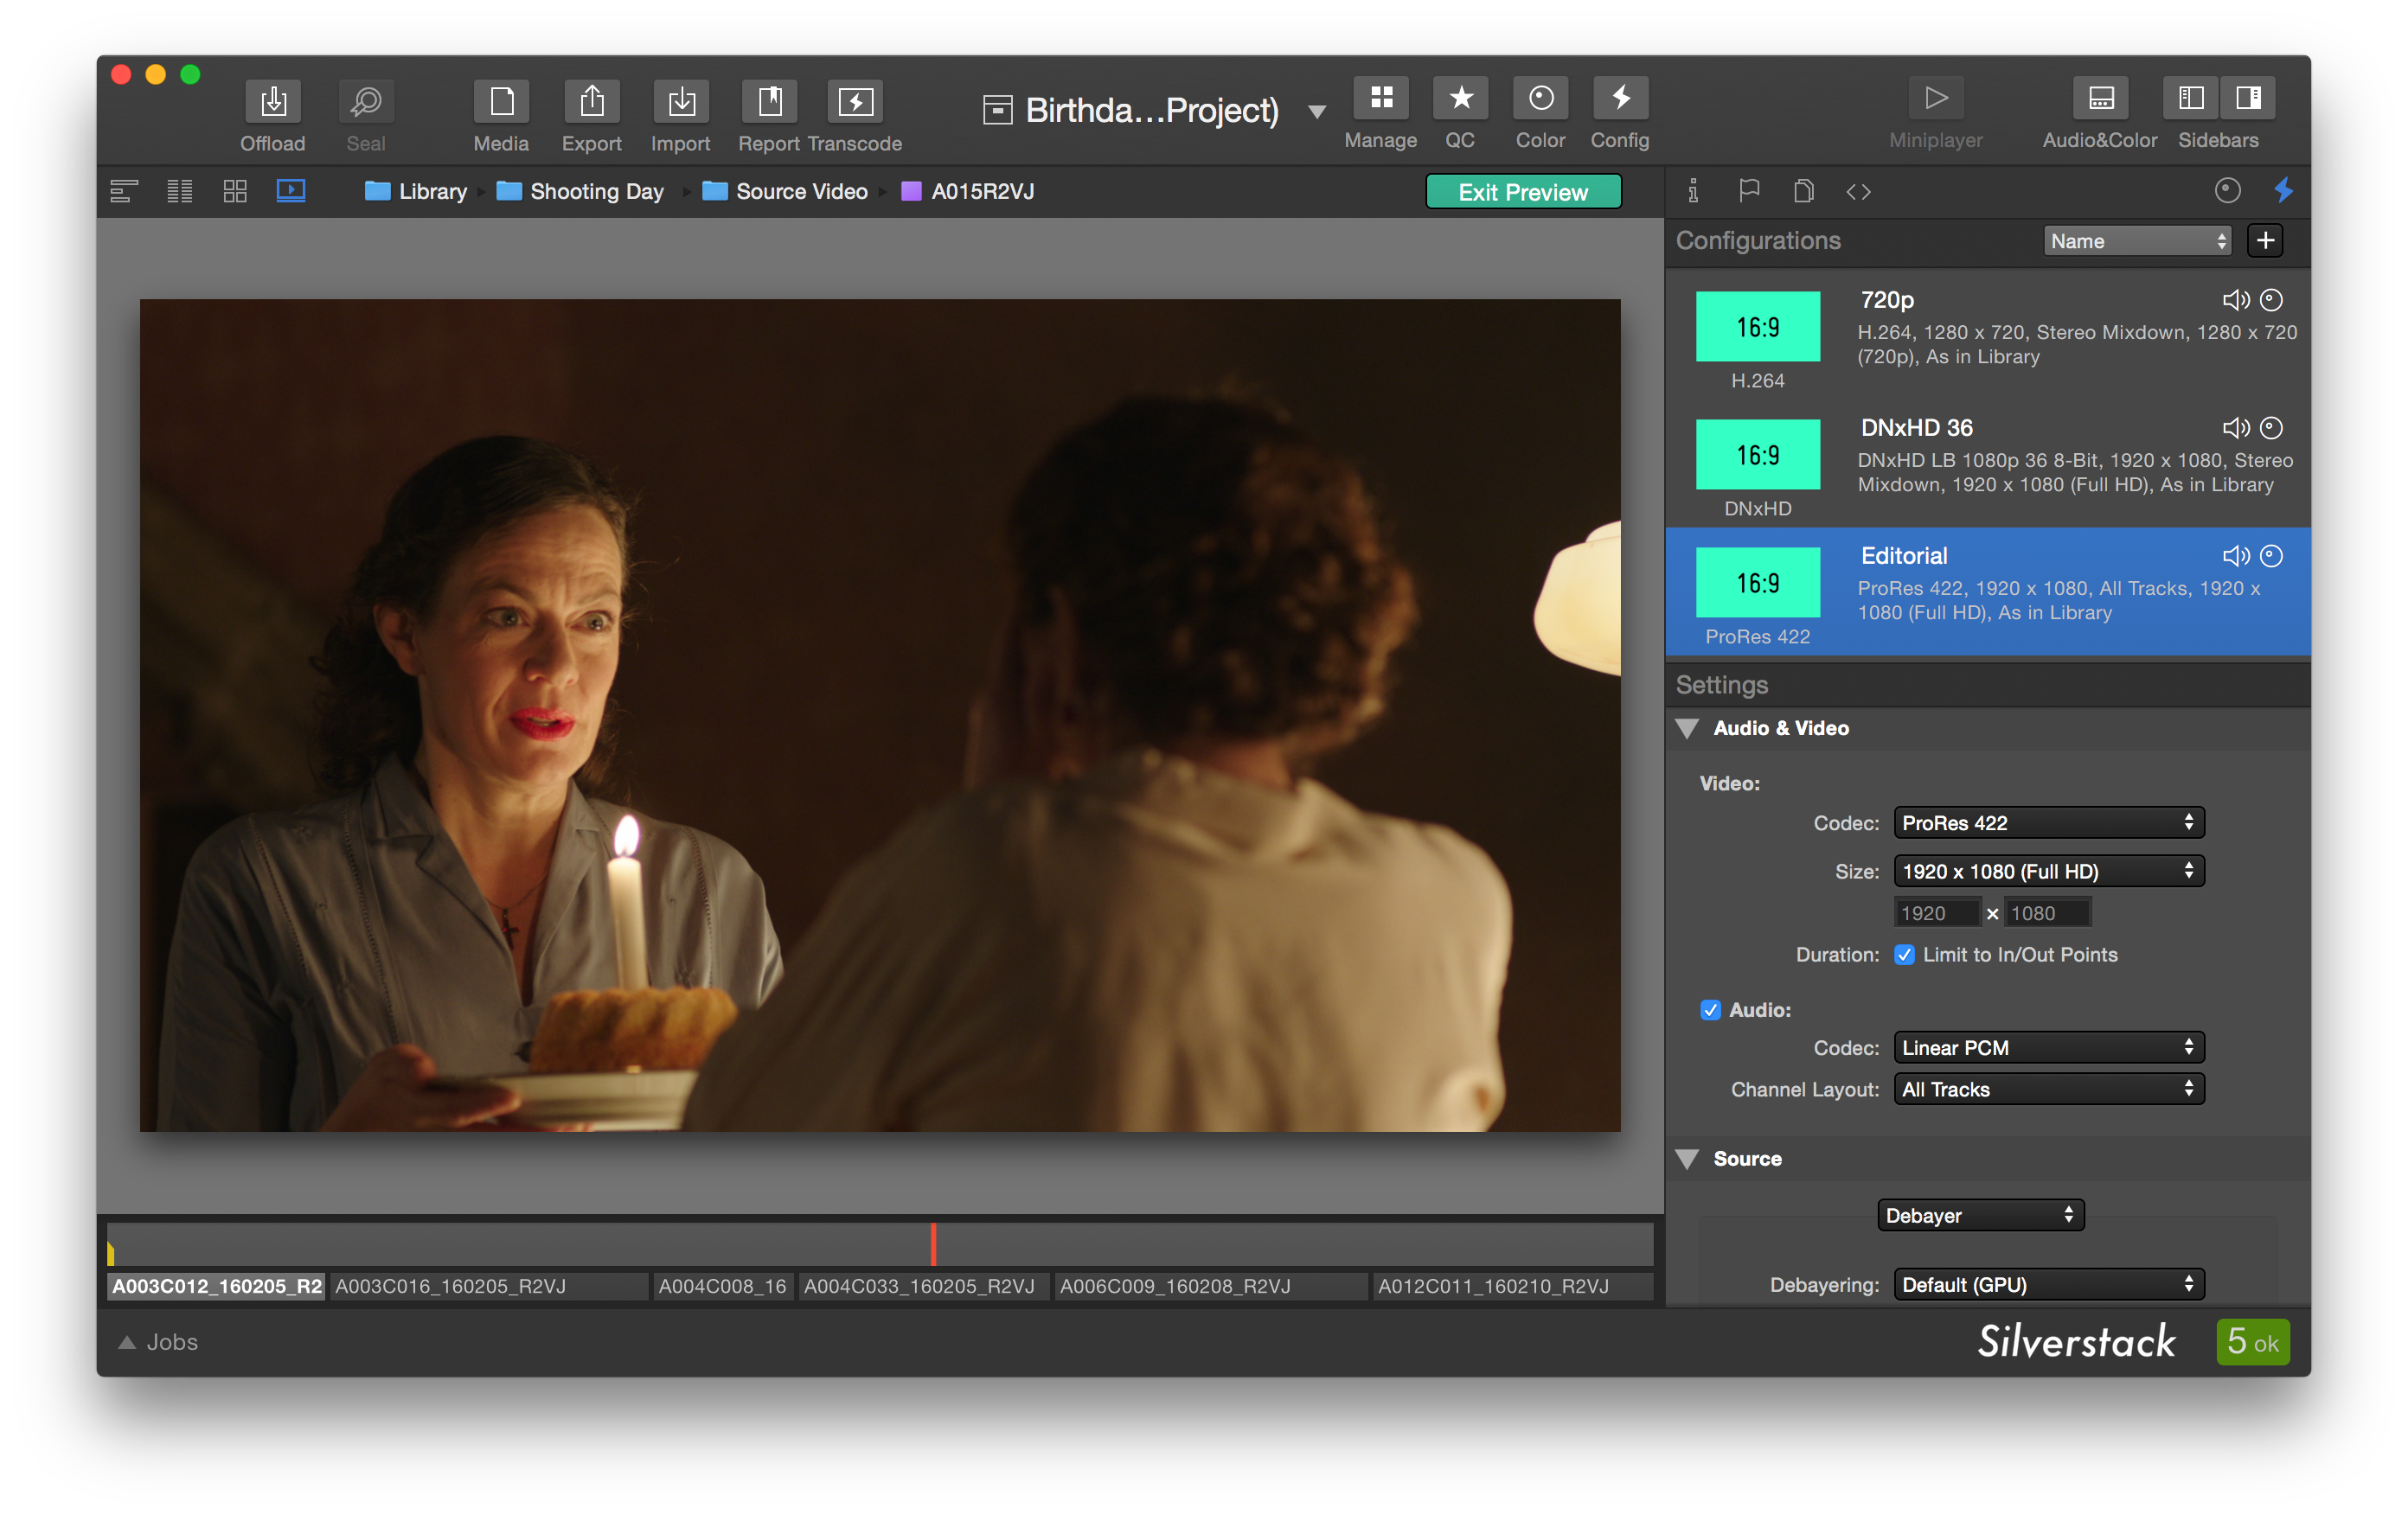
The transcoding functionalities of Silverstack have been updated with Silverstack 6. The update contains a faster transcoding engine, an updated user interface, more transcoding options and a lot more (details below).
Silverstack separates the configuration of the transcoding settings from the actual starting of a transcoding job:
The section “Transcoding Configurations” will explain how to adjust the settings for your transcoding job.
The section “Starting a Transcoding Job” will explain how to execute a transcoding job.
The transcoding functionalities differ in detail for the different Silverstack versions. This article displays the full transcoding capabilities of Silverstack Lab to offer a complete overview. Please see the section “Transcoding Functionalities per Silverstack Version” for a detailed functionality overview per product.
Transcoding Configurations
The transcoding settings can be found in the transcoding tab of the right bar. Click the transcoding icon Image may be NSFW. Clik here to view. to access the transcoding tab:
Fig. 1: Configure the transcoding settings in the transcoding tab of the right bar
The upper part of the transcoding tab shows the custom transcoding configurations. The lower part shows the detailed settings for the selected configuration. The settings will be applied and stored to the configurations immediately.
Transcoding Settings
Audio & Video
Video
Codec: Select the output codec depending on your requirements. There are different options are available (also shown in Fig. 2):
Duration (Limit to In/Out points): By enabling this option Silverstack only transcodes the part of the clip between the in and out points set in the library.
Audio
Tick the checkbox to include audio in your transcoded clips.
Format:
Linear PCM
ACC – Good Quality **
ACC – High Quality **
Channel Layout:
Stereo Mixdown: The custom audio mix created in the audio panel
All Tracks: All available audio tracks (separate tracks, no mute/solo/level taken into account)
Source
Choose from different general debayer options:
Soft (GPU)
Default (GPU)
AHD (CPU)
Choose different decoding options for the source formats:
ARRIRAW:
1/2 resolution
Full resolution
SONY RAW
1/4 resolution
1/2 resolution
Full resolution
R3D
1/8 resolution
1/4 resolution
1/2 resolution
Full resolution
AVC-Intra / XAVC
1/2 resolution
Full resolution
Compositing
Resizing:
Fitting Strategy:
The zoom to fit (Adding black bars/Without black bars) option will adjust the horizontal resolution of the clip to fit in the selected final size.
Zoom to fill will affect the vertical resolution of the footage to the final size, cropping the sides.
1 to 1 will zoom the footage to 100% in the center of the image to adjust to the final selected size, cropping everything else.
Look Source: Choose how to manage the color data for the clip:
As set in Library: enable this setting to include the looks applied to the clip in the Library. For more information on how to apply looks, please check the article The Silverstack Look Library.
None: Disables the color processing and transcodes the clips unmodified (as recorded).
From file: Reads the clip metadata and applies the color processing described in the embedded looks. In case there is no look embedded, Silverstack applies the default Log to Rec.709 conversion for the specific format.
Frame lines*: Apply frame lines to the transcoded clips and choose among different aspect ratios and appearances.
Overlays
Burn Ins: Choose from different options to burn in metadata in the transcoded clip:
Note: The «Custom Text» burn in option allows to add metadata wildcards into the custom text field. For instance, it’s possible to display «Scene: [scene value]-[shot value]» as shown in the following figure by writing «Scene: $scene$-$shot$» in the custom text field.
Select the destination tool and click the “Configure…” button to define the detailed settings for the metadata file export. Click the links to the tools above to learn more about the configuration of the metadata exports.
The Transcoding Preview
When the transcoding tab in the right bar is showing Silverstack automatically switches to a transcoding preview to be shown in the playback view:
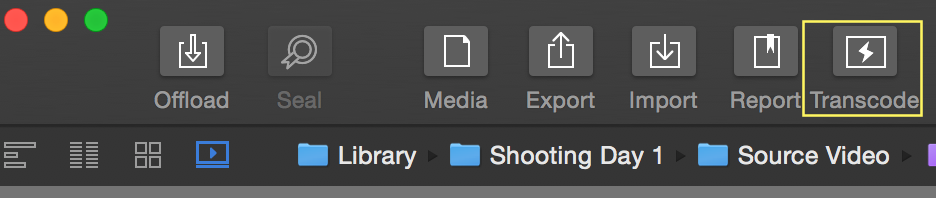
In order to start transcoding the clips, first select a folder or bin in the Library panel. Then click on Transcode to open the wizard. There you will be able to select the clips you want to transcode. Click on continue to select the destination and transcode settings.
Now you are able to select where the transcoded clips will be stored. You can add and remove destinations by using the «+» and «-» buttons. You can select from the configurations previously configured in the transcoding configurations tab:
When the checkbox “Add to Library” is checked the transcoded clips will automatically be ingested into the Silverstack Library after the transcoding job is done. Transcoding statistics will be available for the clips in the statistics view.
Click “Start Render Job” to start the render job. It can then be traced in the jobs panel.
Multi Destination Transcoding
Silverstack XT and Silverstack Lab are able to transcode to multiple destination formats at a time. In certain cases (see below), the transcoding of the configurations has to be run sequentially. The transcoding wizard will give you a hint if the transcoding will be run in parallel or sequentially:
Fig. 8 : The info message about parallel or sequential transcoding
In case of sequential transcoding you can open the “Learn More” panel to get details about the transcoding order.
The following settings can influence the parallel execution of the transcoding job:
In/Out Points
Debayer settings
Decoding resolution
Make sure to set the above settings to the same value when transcoding to two different configurations to avoid sequential transcoding.
Transcoding Functionalities per Silverstack Version
The transcoding functionalities of Silverstack have been updated with version 6. Silverstack, Silverstack XT and Silverstack Lab come with a different set of functionalities concerning Transcoding.
Silverstack
Single destination transcoding
One custom transcoding preset
Timecode and Clip Name burn in options
Watermarking
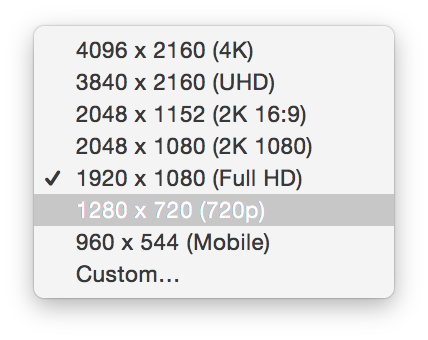
Transcoding resolution up to full HD (1920 x 1080)
Stereo mixdown audio channel layout for transcoded clip
Silverstack XT
Multi destination transcoding
Many custom transcoding preset
Timecode and Clip Name burn in options
Watermarking
Transcoding resolutions higher than Full HD (1920 x 1080)
Stereo mixdown audio channel layout for transcoded clip
Transcoding statistics
Silverstack Lab
Multi Destination Transcoding
Many custom transcoding preset
All available burn in options
Watermarking
Transcoding resolutions higher than Full HD (1920 x 1080)
Fig. 3: Multi clip selection entry in the “Playback” menu
After accessing the Grid View you have to select multiple clips in the timeline to show them in the grid. This can be done with the usual macOS modifier keys for multiple and continuous selection. Hold shift while clicking to select a range of clips and cmd to select and deselect single clips.
The timeline in fig. 4 shows a selection of three clips. The first clip (A006C009_160208_R2VJ) in bold white font is the primary current clip. Editing metadata and adjusting the grade will affect the current clip only. It is also marked in the image with a little white dot in the lower left corner.
The current clip inside of a selection can be changed by clicking on another clip of the selection. To deselect clips from the selection hold the cmd key while clicking. Click a non selected clip to dissolve the selection.
Lightweight Copy of Looks
The Grid View can be useful to reference and compare grades. Therefore it can be handy to easily copy grades. By using the Look library in the right bar looks can be easily created and applied to one or multiple clips. All necessary functionality can be found in the “Look” menu of the Silverstack Main Menu:
Silverstack automatically adapts the interface to avoid a simultaneous display of the same element (List View, Collection View, Player View) in both the main window and the second screen. When an element is accessed that is already shown in the other display it is automatically flipped with the previously shown element on the first screen.