Quantcast
Channel: Pomfort Knowledge Base
Viewing all 283 articles
Browse latest View live

Dynamic Metadata

$
0
0

Silverstack XT and Silverstack Lab come with a “Dynamic Metadata” panel that allows to extract dynamic metadata for supported clip formats.  Dynamic metadata refers to certain metadata information that changes over the time span of a clip (e.g. like TC which can also be considered dynamic). It is stored differently in diverse formats and therefore needs a special process to be accessed.


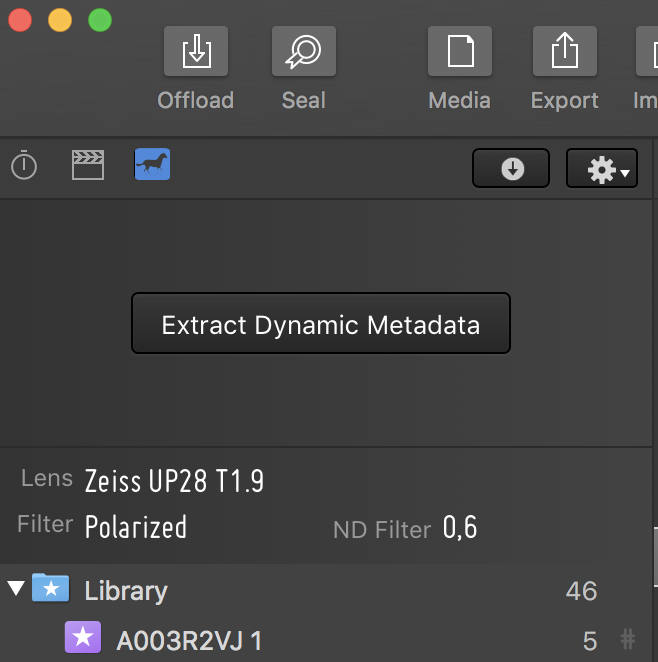
Fig. 1: The dynamic metadata panel in the upper left corner of the Silverstack UI

Fig. 1: The dynamic metadata panel in the upper left corner of the Silverstack UI

Supported Clip Formats

The following clip formats are currently supported for the extraction of dynamic metadata in Silverstack XT and Lab:

  • ARRIRAW (.ari sequences and in .mxf container)
  • ARRI Prores
  • REDRAW
  • SONY XAVC
  • SONY X-OCN
  • SONY RAW

Available Dynamic Metadata

The main part of dynamic metadata is dynamic lens metadata:

  • Focal Length
  • Aperture (T-Stop)
  • Focus Distance

For ARRI ProRes and ARRIRAW clips Silverstack XT and Lab also support:

  • Camera Tilt
  • Camera Roll

How to Extract Dynamic Metadata

Select the third icon displaying a horse in the left sidebar above the library (see fig. 1)

To extract dynamic metadata for the selected clip press the “Extract Dynamic Metadata” button in the middle of the dynamic metadata panel.

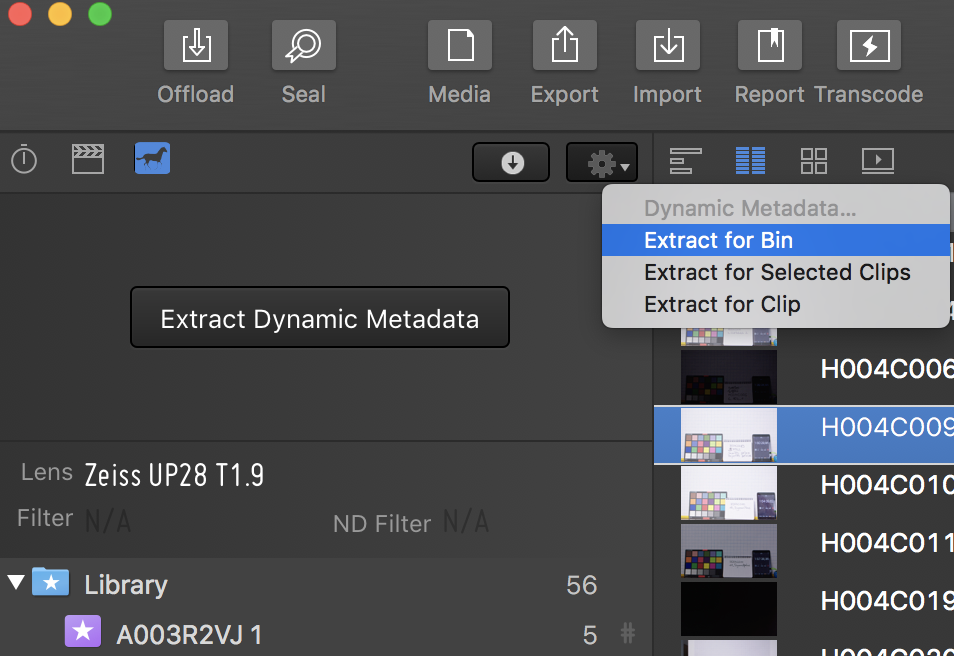
You can start the extraction of dynamic metadata for multiple clips by selecting an entry from the gear menu in the toolbar:

Fig. 2: Extract dynamic metadata for multiple clips

Fig. 2: Extract dynamic metadata for multiple clips

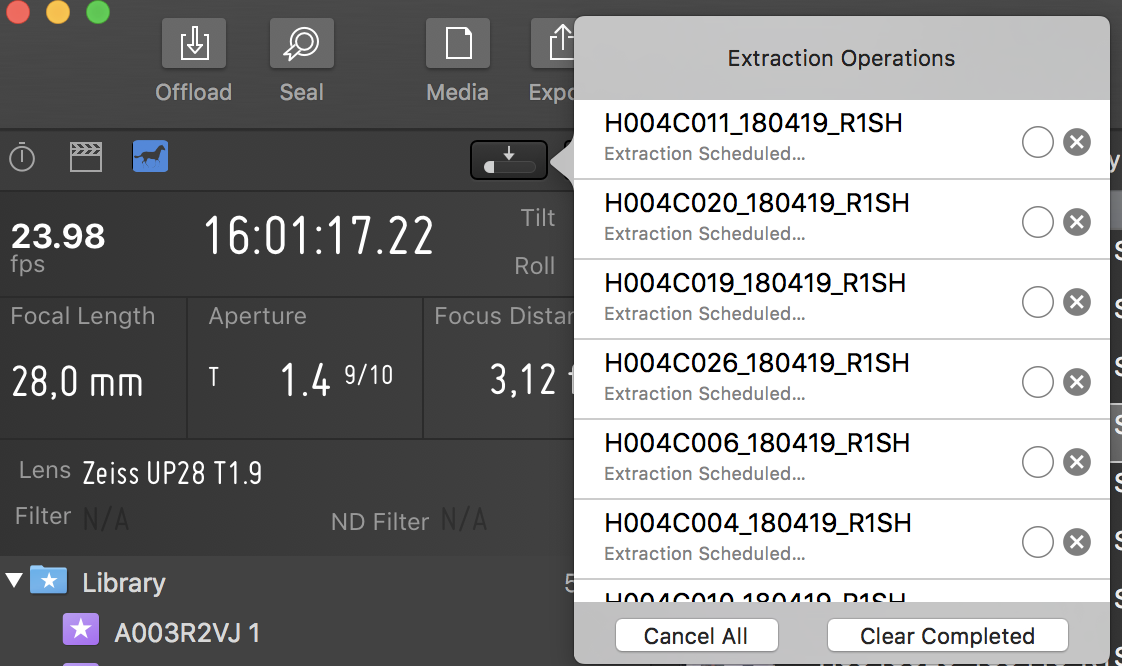
The extraction process for all clips can be monitored in the popover that reveals the current extraction state for every started clip:

Fig.3: Extracting dynamic metadata from multiple clips

Fig.3: Extracting dynamic metadata from multiple clips

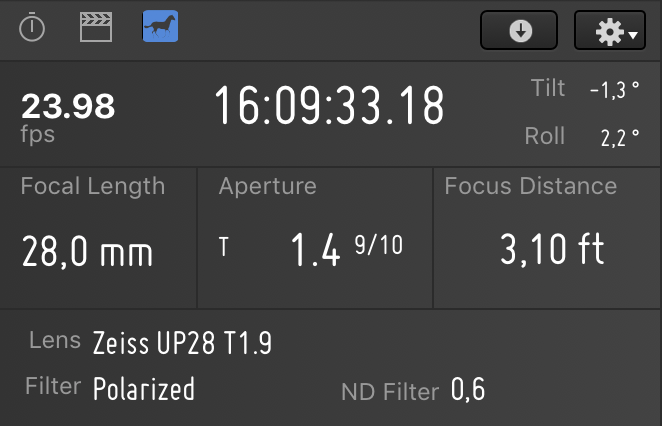
After a successful extraction the dynamic metadata panel reveals the extracted dynamic lens and camera metadata:

Fig. 4: The dynamic metadata panel with successfully extracted metadata

Fig. 4: The dynamic metadata panel with successfully extracted metadata

The metadata can now be inspected during playback or while scrubbing through a clip.

For completeness concerning lens metadata three additional static fields have been added to the lower section of the panel:

  • Lens
  • Filter
  • ND Filter

They mirror data from the library and can also be edited in the General Info of the right sidebar.

Using Extracted Dynamic Metadata for Reports

For clips that support the extraction of dynamic metadata Silverstack extracts the dynamic metadata of the first frame already on ingest. That also allows Silverstack users to benefit from the dynamic metadata functionality and receive lens and other dynamic metadata for the first frame.

The additional lens fields can be exported to clips reports to enhance their information.

Silverstack XT and Silverstack Lab provide an extended functionality to leverage the dynamic metadata for generic clips reporting.

In the “Projects” preferences it is possible to make sure that the static representation of the extracted dynamic metadata, that is used for the General info and table view library, follows the thumbnail frame:

Fig. 5: Using the extracted dynamic metadata of the thumbnail frame for reports

Fig. 5: Using the extracted dynamic metadata of the thumbnail frame for reports

Like this you can make sure that the metadata that is referenced in the reports goes along with the shown thumbnail.

The focus distance unit can also be changed at the same position and allows to choose the display of the focal length in the dynamic metadata panel and the General Info to be imperial (inches/feet) or metric (millimeters/meters).

Dynamic Metadata Burn Ins

Silverstack Lab supports the functionality of adding burn ins of dynamic lens data when transcoding clips.

A “Dynamic Lens Info” string that contains focal length, aperture and focus distance can be selected from the burn in options to be transcoded to the clips.

The post Dynamic Metadata appeared first on Pomfort Knowledge Base.


Incompatible Silverstack or Silverstack Lab Library Version

$
0
0

The Silverstack and Silverstack Lab library versions advance over time across software releases. This is a natural process when a software application advances but inevitably leads to incompatible library version when opening projects with outdated versions of Silverstack/Silverstack Lab.

We always recommend to use the latest version of Silverstack/Silverstack Lab which can be downloaded on the Pomfort Downloads page. Like this you avoid the situation this article takes care of.

Migration and Library Version States

The term “Library Version” basically refers to the state of the Silverstack database and which information it can currently store.

When updating Silverstack to a newer version the existing library is migrated to the latest version. That process establishes compatibility of the existing library with the new library version.
You can learn more about the migration of libraries in the article “How to manually migrate Silverstack 5 projects to Silverstack 6 or Silverstack Lab 6”

After the migration your library is in a later/newer state and therefore not compatible anymore with older versions of Silverstack. If you are forced by any circumstance to move back to an outdated library version of Silverstack, you can restore a backup that has automatically been created during the migration process.

Restoring a Library Backup

Fig. 1: The "Incompatibly Silverstack Lab Library Version" Alert, applies also to Silverstack

Fig. 1: The “Incompatibly Silverstack Lab Library Version” Alert, applies also to Silverstack

When you open a project that has been created with a later version of Silverstack in an older version the alert from Fig. 1 shows.

At this point you have three options that you can choose from with the buttons:

  • Restore Backup: Silverstack automatically offers the possibility to restore the last state for which a backup was created that is compatible with the opened version of Silverstack. Backups are automatically created during migration. Automatic backups can be enabled in the Silverstack preferences’ “Backups” tab as well as manually triggered.
  • Open with New Project: To be able to access Silverstack even though the particular project can’t be opened, you can create a new project to start with. You can again change to other projects from within the application then.
  • Quit: You can quit the application to open the project again with a later version of Silverstack that is compatible with the library version.

In the very rare case that no backup is available you see the following alert that indicates that there is no compatible backup and therefore gives less options:

Fig.2: The alert in case there is no available backup that can be restored

Fig.2: The alert in case there is no available backup that can be restored


The post Incompatible Silverstack or Silverstack Lab Library Version appeared first on Pomfort Knowledge Base.

Exporting Clips and Metadata for the COPRA Dailies System

$
0
0

Silverstack Lab can provide transcoded clips as well as metadata from its library in a compatible format for the COPRA Dailies System. In Silverstack Lab you can export an XML file that accompanies the transcoded clips from Silverstack Lab and provides extended metadata. The proxy clips can then be uploaded together with the XML to the COPRA platform where the additional metadata is then visible.

There are two ways in Silverstack Lab to export a COPRA compatible metadata XML file:

  • The automatic metadata export as part of the transcoding configuration can be set to automatically export a COPRA xml after the transcoding job finishes and the transcoded clips are reingested into the library
  • The manual export can be reached from the “Export” menu in the toolbar and in the context menu of the bin. It allows to manually trigger the export for the xml for the bin with already transcoded clips in the library

Exporting a COPRA Compatible XML with the Automatic Metadata Export Option

The metadata export option allows to automatically create a companion metadata file when a selected transcoding configuration is used for transcoding clips.

You can learn more about Transcoding in Silverstack Lab in the equally titled article.

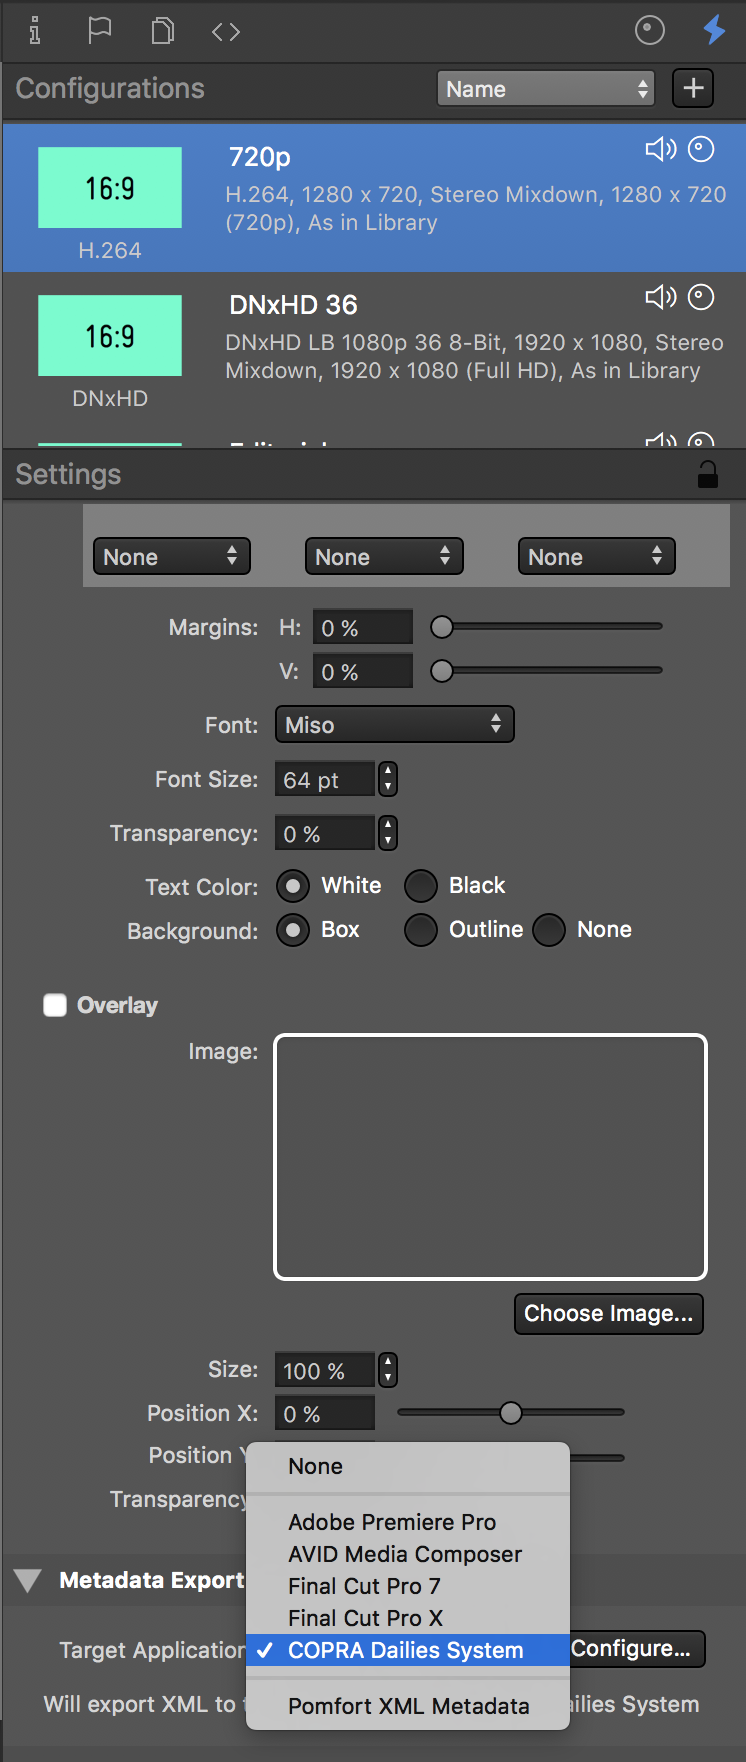
To set the COPRA Dailies System as target application for the automatic metadata export, first go to the transcoding configurations tab of the right sidebar. Select the transcoding configuration from the list that you would like the export to happen for.

Fig. 1: Automatic Metadata Export configured for the transcoding configuration

Fig. 1: Automatic Metadata Export configured for the transcoding configuration


Scroll down to the “Metadata Export” section. Select “COPRA Dailies System” and press the “Configure…” button to select its content.

Fig.2: Configure the content of the COPRA XML

Fig.2: Configure the content of the COPRA XML


When now transcoding to the adapted configuration you selected the metadata export for, the COPRA XML is automatically exported to the same folder as the clips after the job finishes and the transcoded clips are automatically ingested into the “Transcoded Clips” folder of the library.

Manual Export of a COPRA Compatible XML

To manually export a COPRA Compatible XML select the intended bin inside the “Transcoded Clips” folder and choose “COPRA Dailies System” from the “Export” menu:

Fig.3 : Manually exporting a COPRA XML from a transcoded clips bin

Fig.3 : Manually exporting a COPRA XML from a transcoded clips bin

The wizard leads you through the source selection (to select the clips that should be part of the XML) and the content selection (which metadata should be part of the XML).

Click the “Save COPRA XML..” button to export the xml to the intended directory.

The post Exporting Clips and Metadata for the COPRA Dailies System appeared first on Pomfort Knowledge Base.

The Slot Bar

$
0
0

Slot Bar

The most noticeable change in LiveGrade Pro is probably the new, horizontal slot bar in the main window. This slot bar is the place for the new metadata features, and gives an overview of the configured camera slots with its devices. In the device manager (accessible via the “Devices…” button above the slots) you can add new slots (the number is not limited), and change the device configuration for the slots.

LiveGrade Pro’s slot bar

The display of the slot bar can be configured in three modes: As tabs only, with preview image, and with an additional metadata table (with the segmented control above the slot bar).

The preview image shows the last frame grab or the live image (it will also indicate the display of a reference in split view mode). You can configure the width of the slots for different sizes of the preview image via the gear menu above the slots.

Each slot contains buttons for the the most important actions. You can

  • create new entries in the shot library for an individual slot or all slots at the same time,
  • switch between viewing modes (graded vs. original, false color),
  • manually update framegrabs (if a capable device is configured for that slot), and
  • save the slot’s current image to disk as a still image file.

The slot also shows the list of devices used in this slot as small icons below the preview image.

When fully expanded, the slot shows a table of metadata fields for entering and monitoring metadata. These metadata fields are generally editable. A lot of them can also be filled automatically from ANC metadata of the captured live signal if a capture devices is configured.

The metadata in these fields can be used to create a shot report over time, as it is stored in LiveGrade Pro’s shot library.

Depending on your screen size you can configure the number of rows to be shown (via the gear menu above the slots).

The slot bar also holds a section for global metadata that refers to all slots.

Live Metadata and Editing Metadata

For a lot of situations on set the information for the next shot (such as slate information and camera settings) is available in advance. In order to keep your eyes on the action while it happens, the slot bar allows to prepare all necessary metadata by editing it before the action happens.

LiveGrade Pro distinguishes between slot-related metadata (unique to one camera, such as focus distance) and global metadata (concerning the entire shot, such as scene name).

Slot-related metadata fields for a shot

For quickly editing individual fields you can jump from one editable field to the next with the “Tab” key, and there are even keyboard shortcuts for directly editing the metadata of a certain slot (in the “Slots” menu).

You can configure which fields you want to see in the metadata table from the metadata menu accessible in the header area of each slot. This menu can act as a quick overview of metadata, and can be opened from the main menu or with a keyboard shortcut. It can be closed with the “ESC” key at any time.

There are fields for recording information (e.g. clip name, fps), exposure information (e.g. IE, white balance) and lens information (if available through the camera via Cooke /i or ARRI LDS).

In order to pre-fill fields from live camera metadata being captured in the ANC data of the camera signal, you need to have a capture device configured in that slot. The live metadata in the live signal differs from vendor to vendor, so in the capture device dialog you can set the type of camera you want to use. All fields with live metadata can also be switched to be edited manually. Live metadata is currently supported for Panasonic (e.g. Varicam LT), Sony (e.g. F55) and ARRI cameras (e.g. Alexa).

The quick entry panel from LiveGrade Pro v3 for entering metadata is still available. It is shown when the slot bar’s metadata tables are hidden and you create a new shot (“Create Shot” from the “Shot Library” menu). You can also always or never show the quick entry panel with different menu entries in the “Shot Library” menu.

The post The Slot Bar appeared first on Pomfort Knowledge Base.

Look Presets

$
0
0

The right panel besides the shot library has three tabs: One for the shot details, one for look presets, and one for the history.

The tab for look presets allows you to store looks presets for later reuse. To create new look presets based on the grade of the current slot, click the “+” button besides above the “Looks” area. To create a look preset from a stored shot, drag the shot to the “Looks” area. To apply a look preset to the current slot, double click it. You can manage look presets in bins and folders the same way as you can manage shots.

Side panel with look presets

The post Look Presets appeared first on Pomfort Knowledge Base.

Shot Library

$
0
0

Shots

In LiveGrade Pro v3 the rows in the library have been representing “Looks”, with aspects of look presets mixed with aspects of a production history of looks. In LiveGrade Pro v4 all information from a slot is stored in LiveGrade Pro’s library as one “Shot” (as one row in the shot table). This table is now called the “shot library” in LiveGrade Pro’s v4.

The shot library with bin and folder outline

Shots are stored in bins, and bins can be grouped in folders. You can organize folders within folders to create a project hierarchy, similarly to Silverstack. Selection of bins and folders behaves recursively: Selecting a folder shows the shots of all the bins and folders in the selected folder.

The primary actions for lists of shots are:

  • Export look metadata of selected shots as CDLs or lookup tables
  • Create shot reports as PDF from a bin or folder
  • Export a bin or folder to Silverstack’s automatic look matching feature.

The primary actions for single shots are:

  • Apply the shot’s attached look of a selected shot to the current slot
  • Use the shot’s attached still frame or movie clip as a reference (e.g. split screen) in the current slot
  • Output the shot’s attached still frame or movie clip to HD-SDI (either in the current slot or permanently in the library slot)

All actions are available through context menus (right-click) or main menu entries / keyboard shortcuts. PDF reports are now customizable, the selection of columns in the report follows the selection of columns in the shot library.

Shot Info Panel

The right panel besides the shot library has three tabs: One for the shot details, one for look presets, and one for the history.

The Shot Info shows detailed information about the currently selected shot and a preview image. You can resize the preview image by resizing the right panel.

Shot info panel

The post Shot Library appeared first on Pomfort Knowledge Base.

Video Scopes

$
0
0

LiveGrade Pro comes with a set of typical video scope tools: Waveform, histogram and vector scopes. You can switch between different selections of tools in the List above the scopes area.

Video scopes with settings

You can show and hide the scopes area with the “Scopes” button in the toolbar. You can also “undock” the scopes area from the main window by clicking the window button on the right on top of the scopes area. Each tool comes with its own settings. The settings are accessible from the gear button besides the tool selection above the scopes area.

The scopes always process the image currently shown in the selected slot. This can be a still frame as well as a live captured signal.

The video scopes in LiveGrade Pro always analyze the currently processed image. In order to see scopes of the original image, switch to the “Original” viewing mode for the slot.

The waveform panel shows also a RGB curve of the resulting color transform. It represents the curve of all combined transforms including 3D LUTs and CDL transforms. You can disable the result curve in the Settings panel of the scopes.

The post Video Scopes appeared first on Pomfort Knowledge Base.

Library Slot

$
0
0

There is a new way for inspecting stored shots in LiveGrade Pro, the “Library Slot”. The library slot is an extra slot (hidden on default), that can be used to load a shot into. There are two main use cases for that:

A) Compare the look of a stored shot with the current look of a device slot

B) Permanently set the HD-SDI output to a certain shot’s frame grab

In order to un-hide (and hide) the library slot, you can choose “View” menu -> “Show Library Slot”.

The library slot for “pinning” reference stills to the HD-SDI output

To load the selected shot into the library slot you can use the “Load” button in the toolbar. It also un-hides the library slot if it is hidden. You can also drag a shot from the shots table to the preview image of the library slot. When a shot is loaded into the library slot, you see an indicator in the shot table showing which shot is currently loaded. There is also a context menu entry on the shot rows as well as a main menu entry for that.

The library slot has a button with a pin that allows you to pin the output of the viewer and the HD-SDI output to this library slot. If the pin is active, you will see the loaded shot in the viewer and on HD-SDI output, no matter which slot is selected.

In order to quickly switch betten different stored shots in the library slot, use the arrow keys for navigating through the table (arrow up and down), and the keyboard shortcut for “Load” (default is “Y”).


The post Library Slot appeared first on Pomfort Knowledge Base.


Editing Keyboard Shortcuts

$
0
0

There are a variety of keyboard shortcuts available for commands in the main menu of LiveGrade Pro. As you become more experienced with this software you will find that shortcuts helps you to boost your productivity.

Some shortcuts are already predefined. You can also set shortcuts for selected commands that you perform quite often in order to memorize the interaction with LiveGrade Pro more easily.

To inspect the exact list of available keyboard shortcuts go to LiveGrade Pro > Keyboard Shortcuts. This will open the Keyboard Shortcuts Editor (figure 1).

Figure 1: The Keyboard Shortcut Editor


Edit Keyboard Shortcuts

To edit a keyboard shortcut:

1. Select “Map Keys” to allow changes on the key mapping list.

2. Choose the command row.

3. To set or modify a shortcut press the key or keys to use as the new keyboard shortcut. You can use modifiers, numbers, letters and characters individually or in combination.

4. To  remove the associated shortcut permanently press ⌫ (delete / backspace) button.

5. Close the Edit Keyboard Shortcuts window when you are done.

If you choose a shortcut already assigned to a command, a warning dialog box will be displayed that shows which command already used the chosen shortcut.

Figure 2: Alert showing used keyboard shortcut

Select “Cancel” and choose another keys for your current command, or select “Reassign” which removes the shortcut from the  old command and sets it for the selected command (figure 2).

Restoring Sets of Keyboard Shortcuts

You can reset all keyboard shortcuts to latest version of GUI-based default by clicking “Restore defaults…”.

You can also reset all keyboard shortcuts to previous version X default by clicking “Restore vX Shortcuts…”.

Note : Both of these steps executes an automatic restart!


The post Editing Keyboard Shortcuts appeared first on Pomfort Knowledge Base.

Controlling an External Video Router

$
0
0

Video routers often sit at the core of a flexible video setup in a DIT cart. Video routers have multiple input and output ports and allow to easily switch the connections between these ports.

LiveGrade Pro comes with the ability to control a video router and to apply pre-defined configurations of connections – either manually or on certain events such as switching slots in LiveGrade Pro’s user interface.

You need to have a working network connection between the computer running LiveGrade Pro and the video router. For setting up the network, please refer to the manual of your video router.

Managing Video Routing Configurations

From the main menu, you open the Video Routing Configurations window by choosing “Video Routings -> Manage Configurations…”  from the “LiveGrade Pro” menu.

Video Routing Configurations panel

The Video Routing Configurations window shows a list of your configured configurations, and options to edit, duplicate, and delete a selected configuration. You can also test the selected configuration by clicking the “Apply Configuration…” button.

You can rename a configuration by double-clicking the entry in the list.

Creating a new video routing configuration

By clicking the “New Configuration…” or choosing  “Video Routings -> New Configuration…”  from the “LiveGrade Pro” menu, you open the dialog for creating a new video routing configuration.

In order to be able to create connections between in and out ports of your router, you need to connect to the router first. This is needed, so that LiveGrade Pro can fetch a list of ports and their names from the router.

Enter the IP address of your router and click the “Fetch IN/OUT Information” button. If the router’s information has been fetched successfully, the controls below the connection table get enabled and you can start create new connections.

Editing a video routing configuration

Click the “+” button to create a new connection and “-“ to remove the selected connection.

When clicking the “+” button below the connection table, you can choose which input (IN) port should be connected to which output (OUT) port. Choose the ports according to your setup and click “Add”. You can edit the connection at any time by double-clicking the connection.

Only connections of shown OUTs will be changed when the routing configuration is applied. All other output ports of your router will remain unchanged when applying this configuration.

You can test your current configuration by clicking the “Apply Configuration” button. The configuration will become active in the connected video router.

You can sort the connection table by IN our OUT ports, and you can choose if the selected column is sorted by name or port number with the “Sort Criteria” controls below the table.

When clicking “Load All Connections…” you can fill the connection table with the current, complete routing configuration of your video router. This can be useful as a starting point for complex routing configurations with lots of connections.

When clicking “Save…”, you will be prompted a name for the video routing configuration, and the configuration appears in the list of configurations in the Video Routing Configurations window.

Applying video routing configurations via the menu and keyboard shortcuts

Once a video routing configuration is saved, it will also appear in the “LiveGrade Pro -> Video Routings” submenu. When choosing one of the stored configurations in the menu, the configuration gets applied to the connected router.

You can assign keyboard shortcuts to the menu entries for individual video routing configurations with the Keyboard Shortcuts Manager. This allows you to easily switch between video routing configurations with keyboard shortcuts.

See the article about the Keyboard Shortcuts Manager for more information.

Automating video routing configurations

You can automate video routing configurations by using them as actions in the Automation Manager. This allows you to for example change the routing configuration when switching slots.

See the article about the Automation Manager for more information.

The post Controlling an External Video Router appeared first on Pomfort Knowledge Base.

Automating application features with events and actions

$
0
0

LiveGrade Pro allows you to automatically trigger certain actions by events within the application. This can be used to configure the user interface, or apply a video routing configuration for certain situations.

Managing automations

You can create and manage automations in the Automation Manager window. Choose “Automation Manager…” from the “LiveGrade Pro” menu to open the Automation Manager window.

Automations panel

By clicking the “+” button below the automations table you can add a new automation. By clicking the “-“ button you can remove the selected automation. By clicking “Edit…” you can modify the selected automation.

Adding an automation

Setting up an automation

When clicking “+” below the automations table of the Automation Manager, a panel is opened that lets you choose

  • the event, that shall trigger the event, and
  • the action, that shall be performed when the event happens.

Available events:

  • Switch to Slot: Choose one of the options to trigger an action when the user switches to a specific device slot, the library slot, or if any slot change occurs (“Any”).
  • Application: Choose one of the options to trigger an action when the application started or is going to quit, or goes to foreground or background.

Available actions:

  • Slots: Choose one of the actions with slots such as switching viewing modes or refreshing frame grabs.
  • View: Choose one of the actions for configuring the user interface, such as showing or hiding scopes, configuring the slot appearance, or enable or disable dim mode.
  • Video Routing: Choose one of the saved video routing configurations to apply the configuration, or create a new configuration.

Click “Add” to save the new automation. If the automation is enabled, the chosen action will be triggered automatically when the selected event occurs.

Enabling and disabling automations

You can enable and disable single automations by checking the checkbox besides the automation in the automation table.

You can completely disable automations by clicking the automations button in the bottom bar of LiveGrade Pro’s main window. Please note that the automations button is only shown, if at least one automation is configured.

Event and action logging and error

In the bottom bar of LiveGrade Pro’s main window the automation button indicates when an action has been triggered by switching to a blue icon if a n action has been triggered successfully.

You can click on the automation button to disable all automation temporarily.

If an action failed (e.g. because a video routing setting cannot be applied), the automation button indicates this with a yellow icon. The tooltip of the automation button shows additional information about the failed automation.

A complete log of all automation can be reviewed in the “Event Log” tab of the automation manager. Successful automations, but also error messages of failed actions are displayed there. The event log is cleared when the application quits, so you only see log entries of automations since the last start of the application.

The post Automating application features with events and actions appeared first on Pomfort Knowledge Base.

Naming nodes and using node presets

$
0
0

In contrast to look presets, that stores an entire look with all nodes in the look library, a node preset  only contains one or several nodes of a look. When a node preset is applied to the look in a slot, only the nodes of the current look are updated, that are stored in the look preset, while other nodes are left untouched. When applying a node preset, only nodes are updated, that match by name.

Examples

Node presets can be used to store and apply single aspects of a look. Examples of node presets could be:

  • A single CDL node, that represents the correction of a certain filter’s color cast,
  • a 3D-LUT node with a LUT representing a color space conversion,
  • a CDL and a saturation node representing a creative look without the log-to-video conversion LUT, or
  • a 3D-LUT node with a specific log-to-video conversion LUT.

Naming nodes

Each node of a look has a name. A little pen icon appears when hovering with the mouse over a node’s right bar. This indicates that the node can be named. You can edit the default names by clicking on the right bar of a node, where the name is displayed. A small panel is shown with a text field where you can edit the node name.

Please note that nodes need to have unique names within a look. No two nodes of a look can have the same name.

The names of looks are stored in look presets and node presets, and are later used to match nodes when applying a node preset to a look.

Updating single nodes by applying a node preset

When applying a node preset, only nodes are updated in the current look, where the name of the node in the current look matches the name of the node in the look preset.

Preparing a node preset

A node preset is created from the look in the current slot. Edit the names of the nodes that should be used in the node preset to meaningful names. Set all color controls of these nodes according to your needs.

Saving a node preset

Switch to the Look Library in the right bar. You can then save a node preset by clicking the “Add node preset” button above the Look Presets.

A panel is displayed where you can choose, which node should be stored in the node preset. The list shows all nodes of the current grades together with their names and type. Check the checkbox on the left of each row if you want that node to be part of the node preset.

Checkboxes are preset by the current enabling of nodes in the current grade.

You can click the button “Deselect All” to uncheck all rows, and the button “Invert Selection” to un-select all selected nodes and select all un-selected nodes.

Clicking “Save” saves a new node preset into the look library.

Inspecting node presets in the look library

In the node library node presets are indicated by a little icon in the top-left corner. You can click on the little “i” in the bottom left of a node preset to display information about the nodes of the node presets.

Applying node presets

You can apply a node presets by double-clicking it in the list of look presets. The selected node preset is also applied when clicking the “Apply” button above the look presets, or choose “Apply selected Look Preset” from the “Look Preset” menu.

If the current look doesn’t contain a node with the name stored in the node preset, as new node is added with the name of the node in the nodes preset.

Example

Let’s illustrate the use of look presets with an example.

You have a look consisting of a creative CDL node, a second CDL node correcting the color cast of a lens, and a 3D LUT node with the log-to-video conversion.

Let’s assume you have to switch between three lenses regularly, that all have different color casts. You want to save a node preset for each lens, that only consists of the CDL node representing the correction of the lens’s color cast.

  1. Switch to “CDL Advanced” grading mode, click on “Edit”, and remove all nodes except two CDL nodes and one 3D-LUT node.
  2. Click on the right bar of the second CDL node“CDL 2”, and rename it to “Lens Correction”. You should now have one CDL node named “CDL”, and one “Lens correction”.
  3. Use the color controls and set a creative look in the “CDL” node and a 3D LUT for the log-to-video conversion.
  4. Use the color controls of node “Lens correction” and set it to correct of the color cast for your lens A.
  5. Click on the “Add node preset” button above the look presets.
  6. In the appearing panel with the list of nodes select the “Lens correction” node and make sure all other nodes are not selected.
  7. Click “Save” and give the new node preset the name “Lens A”.
  8. Repeat steps 4. to 7. for lens B and lens C.

You now should have three new node presets containing only the lens correction for your three lenses.

When lenses are switched next time, you can simply apply the node presets for the corresponding lens in the look library. The node with the name “Lens Correction” will be updated with the correction for that particular lens.

The post Naming nodes and using node presets appeared first on Pomfort Knowledge Base.

LiveGrade Pro’s Main Screen

$
0
0

The main screen of LiveGrade Pro contains all primary controls for operating the software. You switch between devices, control the look of live signals, work with stored looks, and add entries to the shot library.

A lot of the controls have tooltips, that further describes what the control is doing. Tooltips are shown when you move the mouse over a control without clicking it.

Some elements offer context menu when right-clicking, for example shot entries in the shot library, the current image in slots, or look presets in the look library. These context menus offer additional options for the right-clicked element.

Most of the actions triggered from controls in the main window can also be found in the main menu and can be triggered by keyboard shortcuts. The keyboard shortcuts are designed for quick interaction with the application, and can be customized to your specific needs.

LiveGrade Pro’s main screen

Shot library:

The shot library stores snapshots of the look settings and the settings of attached devices such as cameras. Over the course of a project the shot library grows to a detailed camera log and acts as a reference database for the camera department.

New shot entries can be created in various ways and detail. For some projects where camera settings and the set and lighting is not changing often throughout the day, you may want to only create a few shot entries, in projects with complex setup changes and varying camera and lighting conditions, a regular creation of shots is necessary to create all needed records for covering the shooting day.

Shots always reside in bins, and bins can be grouped in folders. Folders and bins can be used to give your project a logical structure by for example grouping shots in shooting days, cameras, units, or scenes.

You can create bins and folders with the corresponding buttons above the shot library. Drag and drop bins for grouping bins in folders or reordering bins and folders.

Right-click on a bin or folder in the shot library for more options.

Shots table:

The shots table displays the shot entries of the currently selected bin or folder in the shot library.

A shot can contain various metadata fields shown in columns. Fields for metadata include color correction metadata from the grade controls, timecode information and clip names, slate information such as scene and take, camera settings, manual comments and notes, and a preview image if available. You can edit most of the metadata by clicking or double clicking the metadata field in the table.

You can change the list shown columns with the gear menu on top of the shots table. You can reorder the table columns by dragging them.

You can sort by a metadata filed by clicking on the header of a column.

You can set the row height in the shots table by changing “Shot Thumbnail Size” in the “View” menu.

You can choose to only view shots with frame grabs or recorded clips by choosing the filter buttons above the shot list. You can search for specific shots in the currently displayed list of shots with the search field.

Right-click on the row of a shot for more options.

Toolbar:

The toolbar contains important controls for main tasks in LiveGrade Pro, including actions to manage shots, to create a shot report from the shot library, to open the image viewer, and to configure the user interface.

The toolbar offers specific access to the important actions to create new shots in the shot library (including creating frame grabs and recording clips), apply the look of a stored shot on the current slot, update existing shots, and load shots into the library slot for reference.

The “Shades” button dims the entire main window. This can be useful when working in very dark studio environments. You can set the level of dimming in the preferences.

Look library:

In the look library you can store specific settings of the grade controls for later use as “look presets” and “node presets”.

Look presets contain the settings for a full set of grade settings and a preview image, if available. Examples for look presets are the show looks (a hand full of looks predefined by a colorist or prepared in pre-production), or specific looks that my be reused regularly for certain setups.

Node presets only contain settings of a single or a few grade nodes. Node presets are specific, single transforms that are applied to already created looks. Examples are ASC-CDL adjustments for a certain lens or filter that shall be applied on a live signal in addition to the creative look, or a pre-LUT that needs to be applied to the signals of a specific camera.

The look and node presets are stored in bins, bins can be grouped in folders. You can create bins and folders with the corresponding buttons above the look library. Drag and drop bins for grouping bins in folders or reordering bins and folders.

Right-click on a bin or folder in the look library for more options.

Note: The right panel with the look library has different tabs. To display the look library switch to the “Look Library” tab, or choose the “Color” user interface configuration.

Looks list:

The looks list displays look presets and node presets of the currently selected bin or folder in the look library. The presets are created with settings from the grade controls of the currently displayed slot by clicking the corresponding “+” button. Double click a preset to apply it to the grade controls of the current slot.

You can also create a look from a stored shot by dragging the shot from the shots table to the looks list.

You can update presets with the buttons above the looks list. Drag the thumbnail icon of a preset to move it into another bin. You can search for text in the currently displayed list of presets with the search field.

You can lock shots in order to prevent updating them. CHoose “Lock Selected Shots” from the “Library” menu.

Right-click on a thumbnail icon of a preset for more options.

Project chooser:

With the project chooser you can switch projects. Each project has its own shot and look library.

User interface configurations:

In LiveGrade Pro you can manually adjust the user interface to your needs, e.g. by resizing panels,  switching tabs, and hiding and showing usr interface elements.

In addition to that you can also in the toolbar switch to a certain configuration of the user interface (UI) that is targeted for a particular task. Available UI configurations are:

  • Color: This UI configuration puts the color correction and adjusting of looks into the main focus of the application’s user interface
  • Metadata: This UI configuration puts monitoring metadata received from live signals and devices in the main focus.
  • Browser: This UI configuration puts browsing and inspecting stored shots and their metadata in the main focus.

Device slots:

Slots contain controls and metadata for independent hardware systems. Each slot can for example represent one camera in multi-camera setups. You can imagine slots as independent tabs of a web browser – changes in one slot don’t affect the state of other slots.

Slots are automatically assigned characters, starting with “A” for the first device slot. You can also give slots additional names to describe their function or contained devices.

Each slot has a configured set of hardware devices attached. The slot user interface shows a short list of configured devices and indicators that display connection issues.

You can quickly add a device to the current slot by choosing “Add device” from the “Slots” menu.

Some devices are capable of offering either frame grabs or live image. The current image is shown in the slot user interface. LiveGrade Pro also can display this image in a separate viewer window.

For each slot you can maintain a set of metadata.This metadata is then stored in the shot library whenever you create a new shot entry from that slot. Metadata can be edited manually (such as information about used filters), or automatically updated from the attached devices (such as camera settings).

You can create a shot entry in the shot library with the information from current slot by clicking the “+” button in the slot user interface of each slot.

Slots consist of the slot user interface, as well as the grade controls and the video scopes below, e.g. for controlling and inspecting the look of a slot. You can change the height of the slot and its controls by dragging the bar above the slot.

Device Manager:

The configuration of devices and slots is done in the device manager. Open the device manager with “Devices…” button above the slot bar or by choosing “Manage Devices…” from the “Slots” menu.

Global metadata:

While the device slots display metadata that is specific to the slot’s devices, the global slot allows you to see and edit metadata that is valid for all device slots. These are slate information with scene and take fields, production information such as episode and unit, and time and date information. This information is stored together with the slot specific metadata to the shot library with every new shot created for any slot.

You can create new shots for every slot by clicking the “+” button in the global slot. You can configure the shown metadata field with the options menu button above the global metadata.

Note: In the slots appearance “Tabs Only” the global slot is not visible. Switch to another slot appearance or to the metadata user configuration to see the global metadata slot.

Configure slot appearance:

The slot user interface can have different appearances. You can change between appearances with or without a live image, metadata, and primary controls, and choose different height and size settings.

Library slot:

The library slot is a special slot that cannot contain devices. You can use it to inspect shots form the shot library, and for example for permanently outputting a shot’s frame grab on HD-SDI for reference.

You load a shot into the library slot by clicking the “Load” button from the toolbar, choose “Load in Library Slot” from the “Library” menu, or use the context menu of the shot table.

Note: The library slot is not shown by default. You can show and hide it by choosing “Show Library Slot” from the “View” menu.

The library slot has two option buttons that influence the behavior of selecting shots and slots together with the library slot:

  • “Fix HD-SDI output to this slot” (pin button): When enabled, the viewer window and the HD-SDI output always show then content of the library slot – also when another slot is selected. This option can be used to permanently show a reference image from the library slot to HD-SDI output, e.g. in order to compare the live image to this reference image in side-by-side mode of a HD-SDI monitor. When disabled (default behavior), the viewer and HD-SDI output always show the image of the currently selected shot.
  • “Load the currently selected shot in the library slot” (“L” button): When enable, the library slot always loads the selected shot in the shot library. This allows for quick browsing of shots and immediately seeing them on the HD-SDI output or viewer. When disabled (default behavior), you need to manually load an image

State indicators:

State indicators display the state of three device categories:

  • Status of attached hardware control panels (such as Tangent panels),
  • status of the video output device, and
  • status and activity indication for automation events and actions.

The post LiveGrade Pro’s Main Screen appeared first on Pomfort Knowledge Base.
Grade Controls

$
0
0

With LiveGrade Pro you can interactively change the color appearance of live signals. The processing of the image is in general not performed within the computer, but with the use of external processing devices such as LUT boxes, cameras systems, or monitors.

LiveGrade Pro’s color grading feature focus on primary color correction transforms (e.g. ASC-CDL, 3D and 1D LUT, and curve editor). For these transforms typical controls are availabl, and grouped int the user interface as “nodes”.

For most of the attached devices such as LUT boxes, the transforms of all nodes are combined into one transform whenever you change anything in the grade. That transform is then automatically converted into a 3D LUT and sent to the device, often multiple times per second – as long as you modify the controls, such as turning a know.

With some devices such as cameras, ASC-CDL values and lookup tables are updated independently in the camera.

The automatic and continuous update of the attache device allows interactive look control and fine adjustments of the appearance of the live image.

LiveGrade Pro’s grade controls

Nodes: 

The grade controls for the currently selected slot are grouped in “nodes”. A node can contain for example controls for a ASC-CDL transform, or for loading  a 3D LUT preset. Nodes are applied to the live signal from top to bottom, the top node is applied first, and the following nodes subsequently. If the grade node is reset or freshly added, it doesn’t affect the image. Change the controls of a node to give the node effect to the image. Each control or group of controls in grade nodes has a button with a little arrow that resets the controls.

You can enable and disable single nodes by using the checkbox on the left of each node. Disabled nodes are greyed out.

Nodes can have names. Click on the small pen symbol that appears when you move the mouse over the column on the left of each node. You can use names to better identify nodes with different roles (e.g., “pre LUT” and “post LUT”). Node names are also used when applying node presets from the look library for identifying nodes to be updated.

Note: Grade controls can be invisible, if the entire slot and control area is minimized in height. Drag the bar above the grade controls or the slots in order to make space for displaying grade controls.
The video scopes have a minimum height that also influences the minimum height of the grade controls. Open the scopes in a separate window or hide the video scopes in order to resize the grade controls to smaller height.

Grading mode control:

LiveGrade Pro comes with a set of grading modes, targeted to different color pipelines. There are basically four different groups of grading modes:

  • ASC-CDL + 3D LUT modes, (typical color pipelines for a broad range of cameras and projects)
  • ACES modes (for use in projects that choose the ACES pipeline),
  • device specific modes (targeted to the capabilities of certain devices), and
  • freestyle modes (without any limitations in color pipeline, but reduced compatibility).

With some grading modes you can edit the list of used nodes in the grade controls. An “Edit” button appears in the bar with the grading mode if the grading mode allows modification of the grade nodes. For example in the “CDL Advanced” mode you can add more grade nodes, e.g. for additional 3D LUTs or ASC-CDL nodes.

Note: In order to match looks with clips for dailies creation and create the same color appearance on dailies as on the live image, it is needed to coordinate the grade mode and the node pipeline with the dailies creation process.

Look name:

When creating a look preset in the look library or a shot entry in the shot library, a look name will be added. You can prepare and edit this look name in the look name field of the grade controls.

Look display modes:

In a slot you can switch between different look display modes. Look display modes temporarily enable and disable specific grade nodes:

  • Graded: All nodes are enabled. The result image shows the original image with all nodes applied.
  • Bypass: Only 3D and 1D LUT nodes are enabled. The result image shows the original image with only these nodes applied, this will result in a “neutral” image.
  • Original: All nodes are disabled. The result image shows the original image with no nodes applied.

Disabled nodes are greyed out.

With the “False Color” control you can enable and disable the false color mode. The false color mode is always applied to the current result image.

Each slot also has controls to switch look display modes in the slot user interface.

Reset look:

With the reset look controls you can reset a look. “Neutral” clears and resets all nodes. “Reset colors” leaves 3D and 1D LUT nodes untouched and only clears all other nodes such as ASC-CDL nodes.

Video scopes:

The video scopes panel offers histogram, waveform, and vectorscope inspection tools with individual settings. The video scopes show the analysis of the current image of a slot with the current grade nodes applied.

The histogram and vectorscope also include a curve overlay that display the result curve of the combined transforms of all active grade nodes in the slot. The result curve is always shown, also when there is no current image available in a slot.

You can show and hide the video scopes from the main menu and from the toolbar. You can open the video scopes in a separate window by clicking on the “Toggle Windowed / Docked View” button in the bar above the video scopes.

Configure video scopes:

To switch between different types and combinations of video scopes choose the controls in the bar above the video scopes.

You can configure the update frequency of the video scopes from the wedge menu in the bar above the video scopes. The update frequency can have an impact on CPU use of your computer. Lower update frequency (e.g. less updates per second) lead to less CPU usage.

The post Grade Controls appeared first on Pomfort Knowledge Base.
Slot User Interface

$
0
0

The slot UI summarizes all information for a slot, and acts as a tab user interface element to switch between tabs. The selection of a tab is indicated by a blue background.

Slot details

Slot name:

Each slot has an automatically assigned character and a label. You can edit the label in the device manager.

Clip identifier:

The clip identifier can be used to uniquely identify shots in the look library. A common clip identifier format consists of a camera character, reel number, and clip number (e.g. A003C012).

There are different ways keeping the clip identifier updated, so that each created shot gets a meaningful and unique clip identifier:

  • Increase clip and reel numbers: By default the clip name is assembled from the slot character, the “Clip” field and the “Reel” field of the slots metadata. There are shortcuts in the main menu for increasing the clip number and increasing the reel number (and resetting the clip number to 1) in the “Slot” menu.
  • Clip name from camera metadata: If the attached devices provide camera metadata, the actual clip name from the camera is often available. This automatically will use the clip name of the camera as the clip name for a saved shot.
  • Edit the clip name manually: You can also edit the clip name manually.

You can configure clip identifier updating for each slot separately in the menu of the “Configure metadata” button of each slot. There is also a setting for the default behavior for new slots in the preferences.

Summary of configured devices:

Small icons represent the configured devices in a slot. The number of icons shown is limited to three, if more devices are configured, only the first three are shown.

If a device has a connection problem, a yellow warning symbol is shown. The device icons offer tooltips for quick access of the device name, and the warning message in case of a a problem.

Below the clip name, a summary indicator is shown, that is also visible, when the slot is in “Tabs only” mode.

You can configure the devices, add new and remove devices of a slot in the device manager.

Reload devices:

Clicking this button manually triggers a reconnect to all devices of a slot. Sometimes this can solve connection problems, e.g. when a connection was lost due to bad Wifi.

Current image:

If one of the configured devices of a slot provides frame grabs (e.g. from a LUT boxes or attached camera) or live image (e.g. from a capture device), the current image is updated in the slot.

The image shown here can also be shown larger in the viewer window.

The image shown here is also the image that is analyzed by the videoscope.

You can use any frame grab stored or imported image from the shot library to be shown here. This can be used to review the current look of a slot with other images. Choose “Set as Image for Current Slot” from the context menu of a shot row in the shot list, or drag a shot from the shot list on to the image of the slot.

A little “A|B” icon on the current image indicates, that a reference image is set, that is used in the image viewer for comparison. You can remove a reference image by choosing “Remove reference” from the context menu of the current image.

Update framegrab:

With the update framegrab button you can manually request a new framegrab from the attached device. If the shown image is a live image (e.g. from a capture device) or no current image is shown, the update framegrab button is hidden.

Save still image:

With the save still image button you can save the current image as an image file to the file system. A temporary overlay will show the path the image file is saved to.

You can configure the file system location, the format, as well as the naming convention of the still image file in the preferences.

Display options for slot:

In a slot you can switch between different look display modes. Look display modes temporarily enable and disable specific grade nodes:

  • Graded: All nodes are enabled. The result image shows the original image with all nodes applied.
  • Bypass: Only 3D and 1D LUT nodes are enabled. The result image shows the original image with only these nodes applied, this will result in a “neutral” image.
  • Original: All nodes are disabled. The result image shows the original image with no nodes applied.

Disabled nodes are greyed out.

With the “False Color” control you can enable and disable the false color mode. The false color mode is always applied to the current result image.

The controls for the display options of the currently selected slot are also accessible from the bottom bar of the main window.

Slot metadata:

The fields in the slot metadata table can either me edited manually, or updated automatically with camera metadata from the attached devices:

  • An “A” icon indicates, that the metadata field is updated automatically from the device,
  • a little pen icon indicates, that the metadata field is edited manually, although metadata for that field is sent by a device, and
  • no icon indicates, that the metadata field needs to be edited manually, because no metadata for that field is available from any device.

You can switch between editing and automatic update by clicking on the little icons.

For the “Clip” and “Reel” fields you can use the up and down buttons to quickly increase the clip and reel numbers.

You can configure which metadata field is shown in the menu of the “Configure metadata” button.

You can configure how many rows of metadata are shown in the menu of the “Configure slot appearance” button.

You can configure, which device should be the source of the metadata (if multiple devices provide metadata) in the menu of the “Configure metadata” button.

Time code:

Time code is shown, if one of the attached devices provides time code information.

You can configure which device should provide time code (if multiple devices provide metadata) in the menu of the “Configure metadata” button.

Timecode can later be used in workflows where stored shot and look information shall be matched to recorded camera clips.

Configure metadata:

When clicking the “Configure metadata” button, a menu with all available metadata fields, as well as options for the metadata processing, merging, and display.

“Metadata from…” and “Timecode from…” let you choose what should be used as the source for that information in case multiple devices provide that information. When “Combine metadata from all devices” is checked, metadata fields from multiple devices are merged.

The “Clip identifier” submenu lets you choose a scheme for the updating of the clip identifier. You can choose either predefined schemes, or create your own by choosing “Edit custom clip identifier…”.

The metadata fields are grouped in sections, you can show and hide a single metadata field by checking or unchecking it. You can show and hide entire sections by clicking on the section heading.

If a metadata field’s value is automatically updated from a device, the value is shown behind the field’s name.

“Add entries with values from devices” adds all metadata fields that currently have values from devices.

“Apply selection to all slots” will set the selection of displayed fields of all other slots to the selection of displayed fields of the current slot.

The post Slot User Interface appeared first on Pomfort Knowledge Base.

The Device Manager

$
0
0

The device manager contains all controls to setup devices and slots, and represents the core configuration dialog for attached and controlled hardware devices.

You can open the device manager either by clicking on the “Devices…” button in the slot bar, or by choosing “Manage Devices…” in the “Slots” menu.

The device setup is saved and restored on every application restart. So once the devices are configured, they will show up in the same way after the computer, the devices, or just the application performed a restart.

The device manager

List of Slots:

The device manager shows the same list of slots as the slot bar in the main window.

You can add a slot by clicking the “Add Slot” button on the bottom of the window. You can delete a slot by clicking the “Delete Slot…” button in the slot.

Each slot can have a descriptive name, type into the text field to edit the slot label. The slot label also appears in the slot user interface in the main window.

List of devices in a slot:

Each slot contains a list of devices. Each device is represented by a device row with an icon. You can move devices from one slot to another by dragging and dropping the device rows.

Some devices also can act as an image source, such as LUT boxes that support frame grabs. For these devices an additional row is added that represents the image source.

Each device shows information about the identity or the connection of the device, such as a device name or IP address.

Manage devices in a slot:

You can add devices by clicking the “Add Device…” button, and choose the device type from the shown menu.

You can delete a selected device by clicking the “Delete…” button.

Configure a device:

Devices can have different configuration options.

  • LUT boxes can be identified with the “Blink” button, a cycle of primary colors will be displayed on the output image of the LUT box to identify the right physical device.
  • With the “Config…” button you can configure connection options of the specific device.
  • Some device offer the possibility to set video range options and color management options.

Slot and device configurations:

You can save and restore entire configurations of slots and devices with the “Save and Restore” button. The list of slots and devices with their configurations can be stored in an external file, and restored from such a file at a later time.

This can be used either to transfer your hardware setup to another computer (e.g. when replacing a computer), or to switch between different hardware setups with the same computer (e.g. when switching between an advanced setup in a DIT cart and a smaller, more mobile setup.

Refresh controls:

“Reload Devices” re-initializes the connections to all devices.

“Refresh ICC Profiles” reloads the list of ICC profiles for color management settings.

Link slots:

You can link slots to interact with multiple slots simultaneously. This can be used e.g. for parallel processing of signals, e.g. for parallel SDR and HDR viewing of the same signal, or for interacting with multiple camera signals at the same time.

The post The Device Manager appeared first on Pomfort Knowledge Base.
Exporting Shot Information

$
0
0

The shot library can contain a lot of information, that is valuable for other steps and roles in the workflow.

The most important destination for look information is the dailies creation process. For that there are two possibilities of exporting the look of stored shots:

  • Exporting a shot log PDF report.
  • Exporting single look files in various formats, such ASC-CDL, 3D LUT, and camera specific look files.
  • Exporting entire folders or bins of the shot library for matching the looks to recorded camera clips in other applications such as Silverstack Lab.

Exporting a shot log PDF report:

You can export the shots of the currently selected bin or folder with their metadata as a PDF report. Either choose the “Report” button in the toolbar, choose “Export Folder as Look Report…” from the “File” menu, or use the context menu of the bin or folder to create a PDF report.

The report consists of a table of shots with metadata columns. The selection of columns follows the selection of columns in the shot table of the main window. You can change the columns in the report by changing the columns in the shot table.

Exporting single look files:  

By choosing “Save selected shots as…” from the “Library” menu, a file save dialog opens that contains options for the exported file formats.

The “Export looks” setting lets you choose from a list of formats, containing ASC-CDL, various 3D LUT formats, and device specific files such as Alexa look files.

Note: Not all export formats are available for all shots. The list of offered export formats depends on the grading modes of the looks stored with the selected shots.

The “Naming scheme” lets you choose a scheme for the use of file names for the to-be-exported shots. You can either choose one of the predefined schemes, or create your own scheme based on metadata from the shot.

You can also export a still image for each shot, based on the available frame grab for a shot. You can choose which format the image file shall be, and if the look shall be applied, or of the original image should be exported.

You can enable and disable the export of both look files and image files, so that you can export only look files, only image files, or both.

Exporting folders of shots for look matching:

You can export a look archive that contains information of multiple shots with thumbnail, and all metadata and look information. You can use this look archive to export a folder (e.g. a shooting day) of your shot library to Silverstack Lab for automatic matching of look and camera metadata with the recorded camera clips.

For exporting a look archive, choose “Export Folder as Look Archive…” from the “File” menu, or use the context menu of a folder or bin in the shot library.

The post Exporting Shot Information appeared first on Pomfort Knowledge Base.

The Image Viewer

$
0
0

The image viewer shows the image of the currently selected shot or the library slot.

When an HD-SDI output device is configured, the HD-SDI output of that device always shows the same image as the image viewer.

You can set the image viewer to fullscreen on the screen where the viewer is currently shown by clicking the green little icon in the window header bar, or click “Fullscreen” in LiveGrade Pro’s toolbar.

In a setup with two computer screens attached to your Mac (or a notebook screen with an additional external monitor) the viewer can go fullscreen on one computer screen, while the LiveGrade Pro main window is be shown on the other screen. To do so, move the image viewer window to the second screen and then go to fullscreen.

The image viewer can display a second image or look (e.g. from a frame grab of a shot) for reference in a split-screen or overlay mode.

The image viewer

Image Overlay:

The image overlay displays the display options for switching between “Graded”, “Bypass”, and “Original” image. These controls double the controls from the slot user interface.

The image overlay also offers a “Export image” button. This button saves the current image in the file system of your Mac. This control doubles the control from the slot user interface.

Reference Overlay:

The reference overlay shows the name of the image shown for reference, and allows to remove the reference.

Reference Options

In the reference options you can choose which compositing mode should be used for displaying the reference image with the viewers image.

Options are

  • Left – Right: Side-by-side with movable image splitter, viewer image is left, reference image is on the right.
  • Overlay: Reference image is composited over the viewer image with variable transparency.

Image Splitter:

You can move the image splitter (e.g. shown in “Left – Right” mode) by dragging it.

Image Information:

The header of the image viewer displays the current slot name, the name of the image and the name of the reference image.

The post The Image Viewer appeared first on Pomfort Knowledge Base.

Article 5

$
0
0

Pomfort currently develops an update for Silverstack Lab – Silverstack Lab 6.5 . All members of the Pomfort beta program as well as selected customers now have the chance to preview and test the latest beta version of Silverstack Lab 6.5.

What Is New in This Beta of Silverstack Lab 6.5 ?

Silverstack Lab 6.5 Beta currently comes with the following improvements:

Data Management Moves Forward

  • Copy speed improvements for file sequences and high disk I/O speeds
  • More flexible bin organization with automatic library sorting options
    • E.g. keep bins always sorted by name

Better Dailies & Proxies Control

Simplify the Right Deliverables

  • Create AAF files to accompany DNx MXF OP-Atom proxies for Avid Media Composer
    • Speed up and simplify Media Composer Editing Workflows by delivering AAFs
  • Advanced custom crop options to exact resolutions including preview visualization
    • Pixel exact control of clip size for playback, transcoding, still export, reports and more

New Transcoding Output Formats

  • Transcode to DNx codecs in Quicktime (.mov) container
  • Transcode to H.264 and H.265 (HEVC) codecs in MP4 container (.mp4)

Better Input and Output Control

  • Report names and exported still frame naming can now be controlled with metadata wildcards
  • Customize keyboard shortcuts to speed up your workflow

New Camera Formats with Advanced Camera Support

  • Blackmagic RAW

Miscellaneous

  • Adding the possibility to hide certain export options to be able to show only a user required custom set
  • Enabled experimental CUDA support for RED SDK

Download the latest beta of Silverstack Lab here

The beta is available until the official release. Beta versions are not suitable for productions. A valid Silverstack Lab license is required.

We are happy for any feedback! Please send an e-mail to: support@pomfort.com


More Info in the KnowledgeBase

You can find more information in our KnowledgeBase – detailed articles cover the following topics:

System Requirements: Intel Mac with macOS 10.12 or higher.

The post appeared first on Pomfort Knowledge Base.

Article 4

$
0
0

Pomfort currently develops an update for Silverstack – Silverstack 6.5 . All members of the Pomfort beta program as well as selected customers now have the chance to preview and test the latest beta version of Silverstack 6.5.

What Is New in This Beta of Silverstack 6.5 ?

Silverstack 6.5 Beta currently comes with the following improvements:

Data Management Moves Forward

  • Copy speed improvements for file sequences and high disk I/O speeds
  • More flexible bin organization with automatic library sorting options
    • E.g. keep bins always sorted by name

New Camera Formats with Advanced Camera Support

  • Blackmagic RAW

Working with Clips in the Library

  • Advanced custom crop options to exact resolutions including preview visualization
    • Pixel exact control of clip size for playback, transcoding, still export, reports and more
  • New Transcoding Output Formats: Transcode to H.264 and H.265 (HEVC) codecs in MP4 container (.mp4)
  • Report names and exported still frame naming can now be controlled with metadata wildcards
  • Customize keyboard shortcuts to your needs to speed up your workflow

Miscellaneous

  • Adding the possibility to hide certain export options to be able to show only a user required custom set
  • Experimental CUDA enabled for RED SDK


Download the latest beta of Silverstack here

The beta is available until the official release. Beta versions are not suitable for productions. A valid Silverstack license is needed.

We are happy for any feedback! Please send an e-mail to:  support@pomfort.com


More Info in the KnowledgeBase

You can find more information in our KnowledgeBase – detailed articles currently cover the following topics:

System Requirements

Intel Mac with macOS 10.12 or higher.

The post appeared first on Pomfort Knowledge Base.
Viewing all 283 articles
Browse latest View live